
version 0.9
Last updated: September 14, 1998
by Wade Lanham
I'd like to make a few things clear.
First, I would NOT recommend putting the Bose system into your car. I (as well as many others) am not happy with the stereo's sound. If you have heard it in several cars, listened to your favorite music, and been happy with its sound quality, then maybe it isn't such a bad idea for you. A big reason I installed it was because I wanted to keep that "original" look, and I also didn't want to get into the endless money-spending craze of constant stereo upgrading. I'd rather spend a little on a decent stereo and be done with it. I'll probably end up spending more money on this system trying to make it sound decent because it's below the minimum I can handle in a stereo system.
Secondly, it is very difficult to buy all the parts needed in one purchase, much less for a fair price. If you don't buy all the pieces at once, then you could easily run into the problems I had. It took me two months to get my hands on all the parts I needed. So my car's interior was half-assembled and looked like a pig sty for two months (not cool). Also, it's a LOT of trouble trying to find all the parts. I bought all my parts used for about as little as anyone could from rx7 list members, and I have around $600 invested. I could have bought a satisfactory aftermarket system for $600, IMO.
The only other person I have personally talked to who installed the system also had problems locating the parts, and is also dissatisfied with the sound quality.
Now that that's out of the way, if you still really want the system (some people just won't
listen ;) ), the rest of this document should cover everything you need to know to install it (or
to give to your trustworthy local audio shop to help them install it).
There is nothing really tricky about this. Just take your time and make sure you make all the wiring changes correctly. I wouldn't let a shop do it if you have any experience with car stereos or electrical wiring. I'm sure they'd charge ALOT to do it, and they might not even do it right, even with these instructions. At least, if you have this document, you probably have internet access and can always send questions to me or Carlton Spence.
I was able to locate the r/b wire pretty fast. I removed the bottom bolt
from the fuse box assembly. This allowed me to pull the box out to see what
wires were connected behind it. I thought that I had located the lg/b wire,
but could not make a connection. After a few hours I decided to check the
main bundle coming in from the firewall, and there it was. I purchased the
relay when I first got the Bose system. I had hoped that it would just plug
it in and go. At the time there were not many dealers stocking the relay.
There may have been about a half dozen or so in the whole nation.
--Carlton
To remove the inside harness you have to first pull the little silver cotter pin that holds the plastic door hinge. On the top of the harness there is a red clip. This cilp has to be removed. I used a pair of needle nose pliers to pull it out. --Carlton
I didn't take the pin out of the door. With a little work I removed the outside harness pretty easily. Pulling the inside harness out of the body was much harder.
Once I had both halves of the harness out of the body where I could work
with them, I drilled out two of the UNUSED holes on each of the halves. Then I
slid about 1 foot of my wires through the inside harness, stuck the inside harness
into the body, put the 1 foot of wire through the same relative holes in the outer
harness, then plugged the harness back together. That way the two wires ran through
the harness and were protected from the elements. I then tapped them into the B/R
and B/O wires about 1 inch outside the outer harness.
--Wade
Get it started the same way you did the cd player, with a coat hanger or Walmart stereo removal tool. You need to put something into the holes on each side and push them inward towards the unit to delatch the clips.
Pull it out enough so you can get your hand behind it. On the rightmost (passenger) side, there are two black, heavy cables for the antenna. They lead down the left side of the passenger area. Take the small piece of plastic off the side (about where the passenger knee is) and you can probably find the connectors. Once you fish the connectors out, pull them apart. Then you can get your hand behind the head and pull the cables up (and out).
Once I removed this for the first time, I found there is quite a bit of
slack in all the cables but the antenna. If you can get the antenna
disconnected FIRST, you could carefully pull the head unit out enough so
you can actually see the back of the unit and remove the rest of the
connections. That would definitely be the easiest way.
--Wade
Pay close attention to the diagrams for the harnesses. They appear on
the diagrams as if you were looking at the harness from the back (where the wires
go into the harness). You'd likely notice this when comparing your equipment to
the diagrams, but I thought I'd mention it just in case someone didn't notice.
Thanks to Carlton Spence for his much needed help on this matter.
Both of us frequent the rx7 mailing list, so if either of our addresses are
invalid, check the rx7 list, someone will know our current addresses.
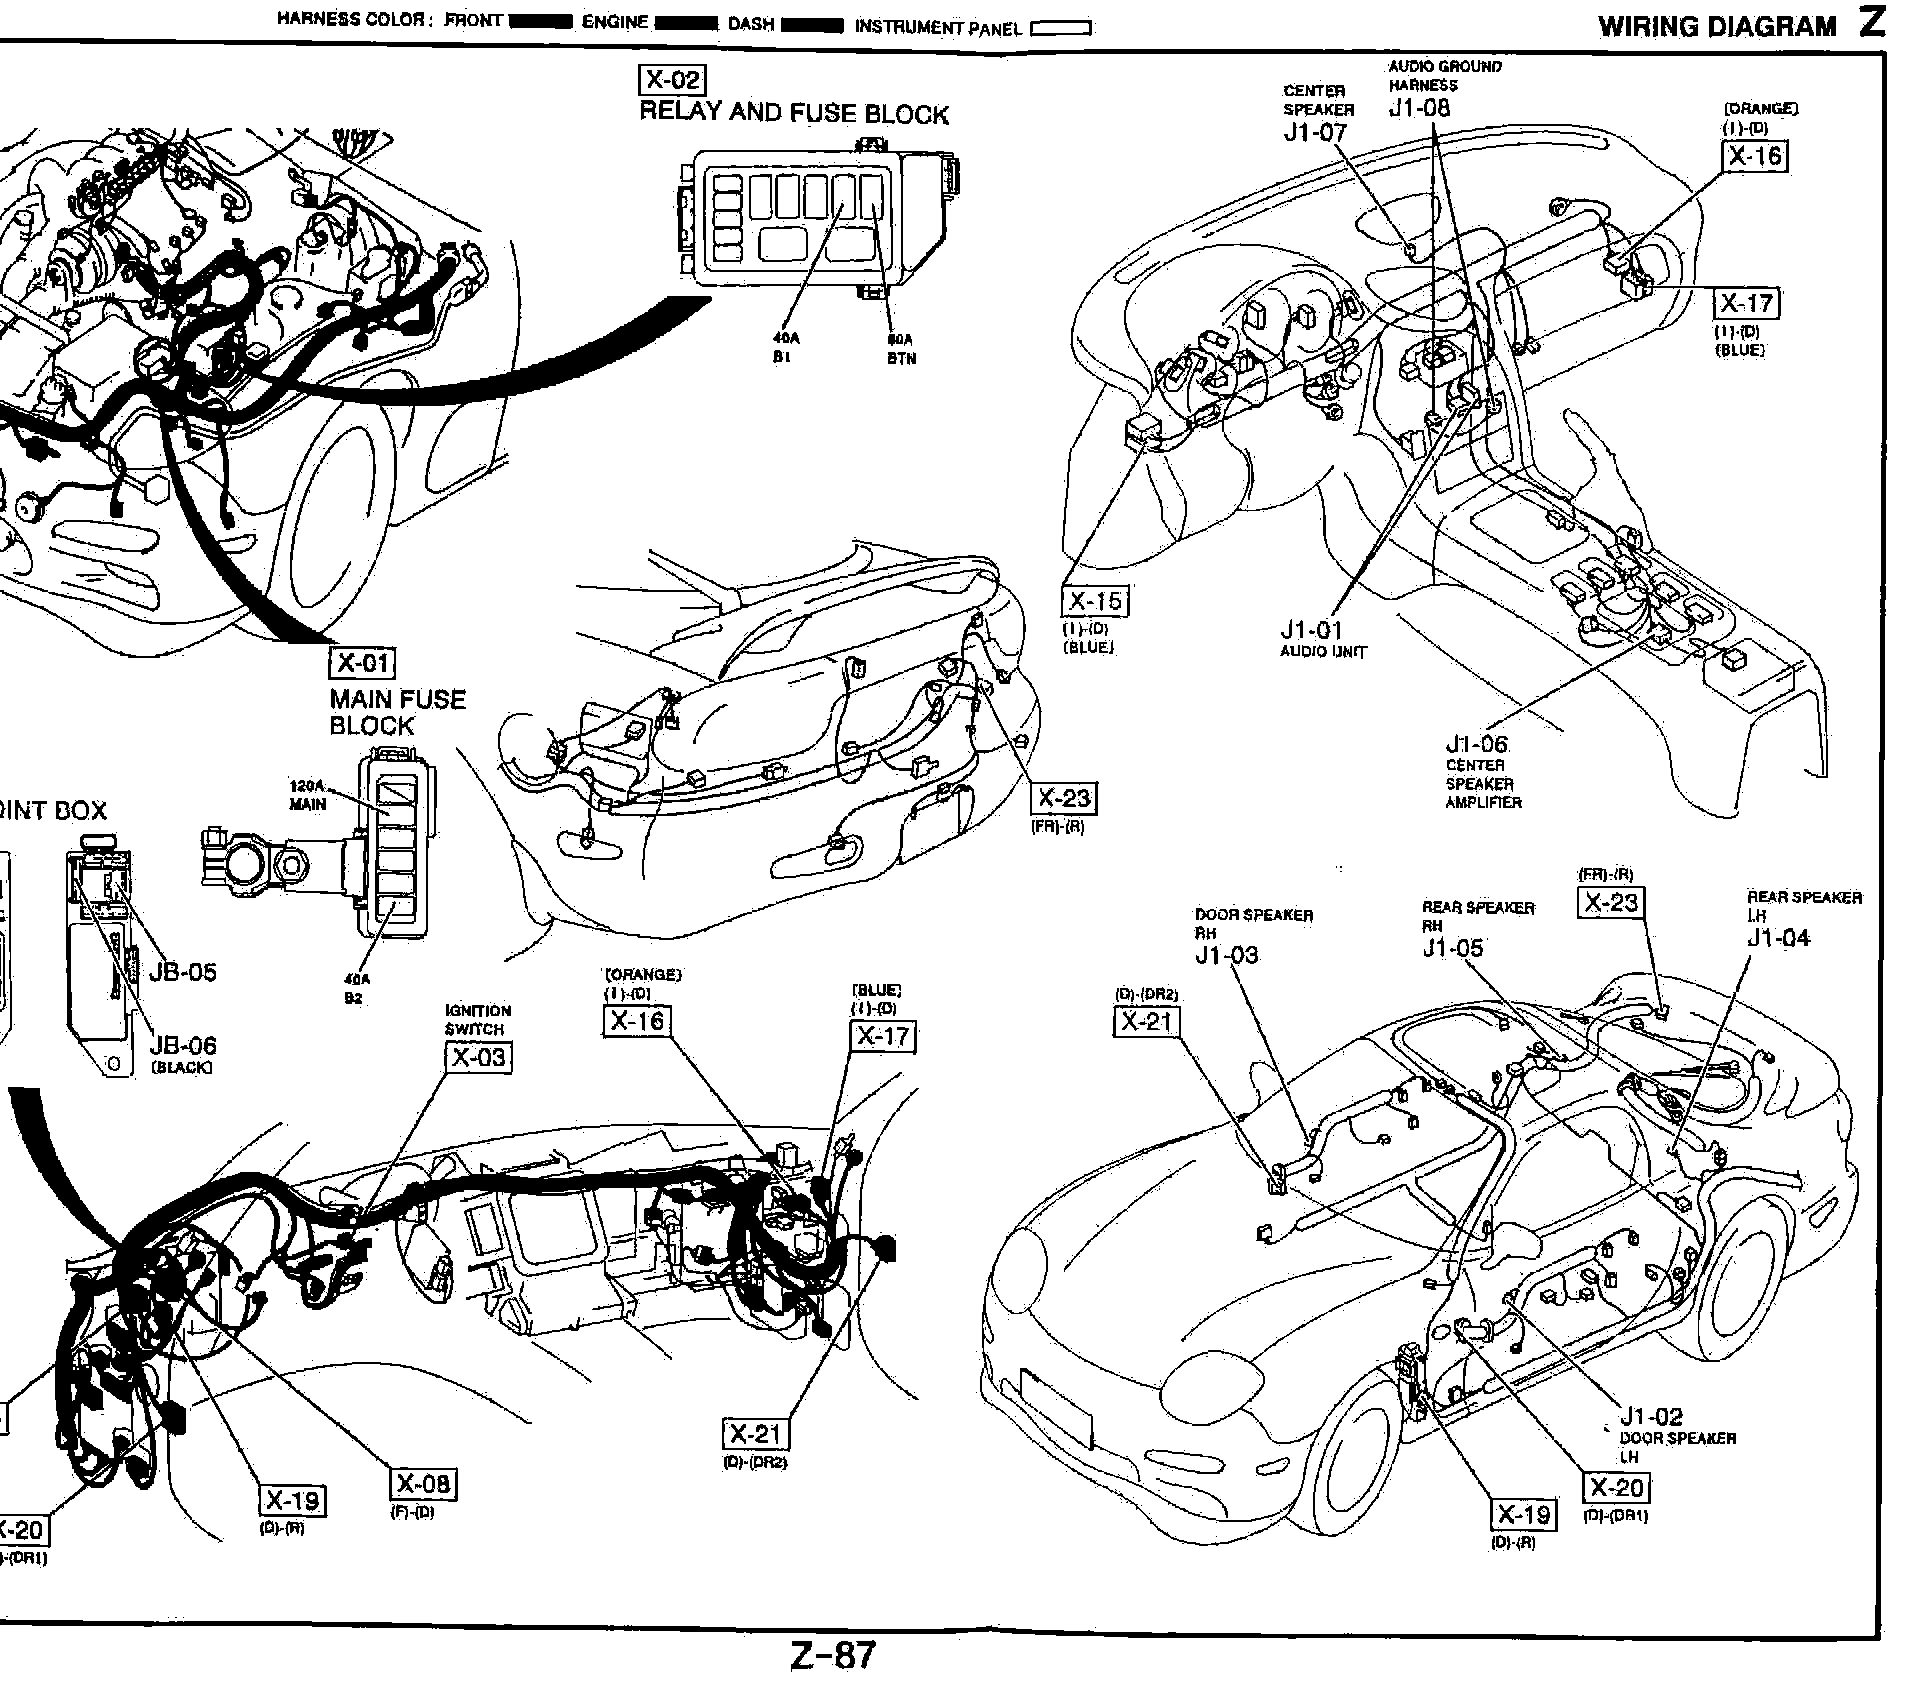
Wiring Diagram for Base Model Stereo
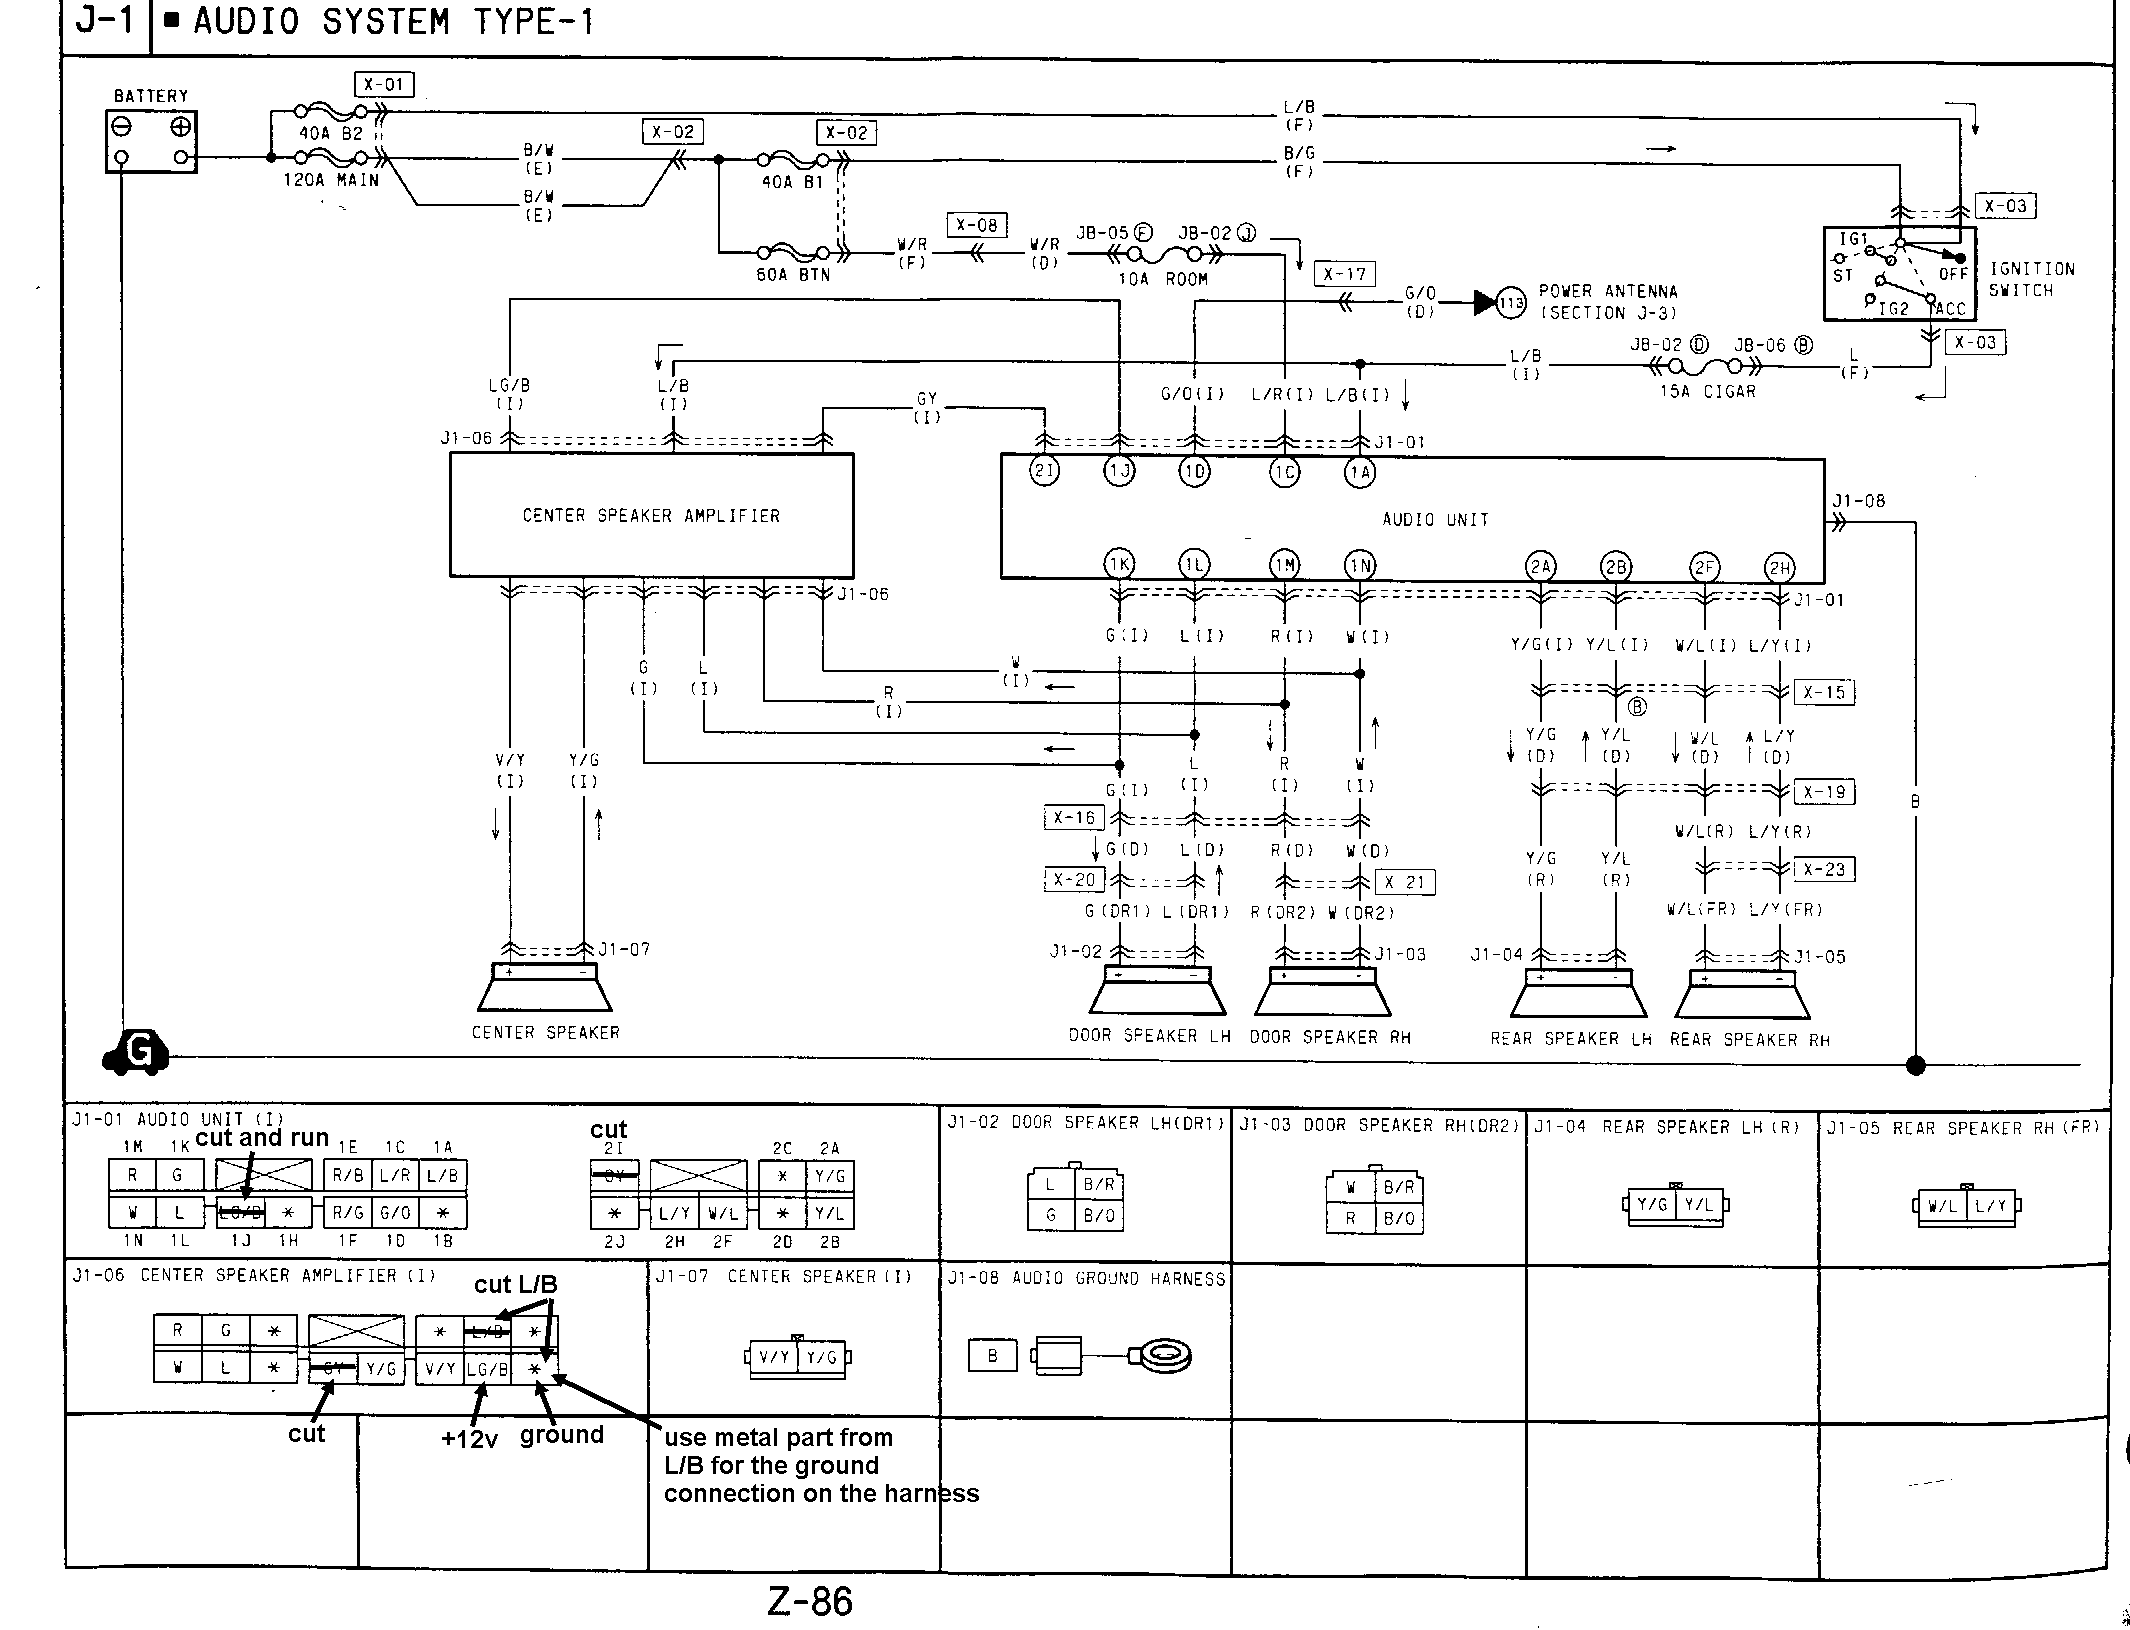
Wiring Schematic for Base Model Stereo
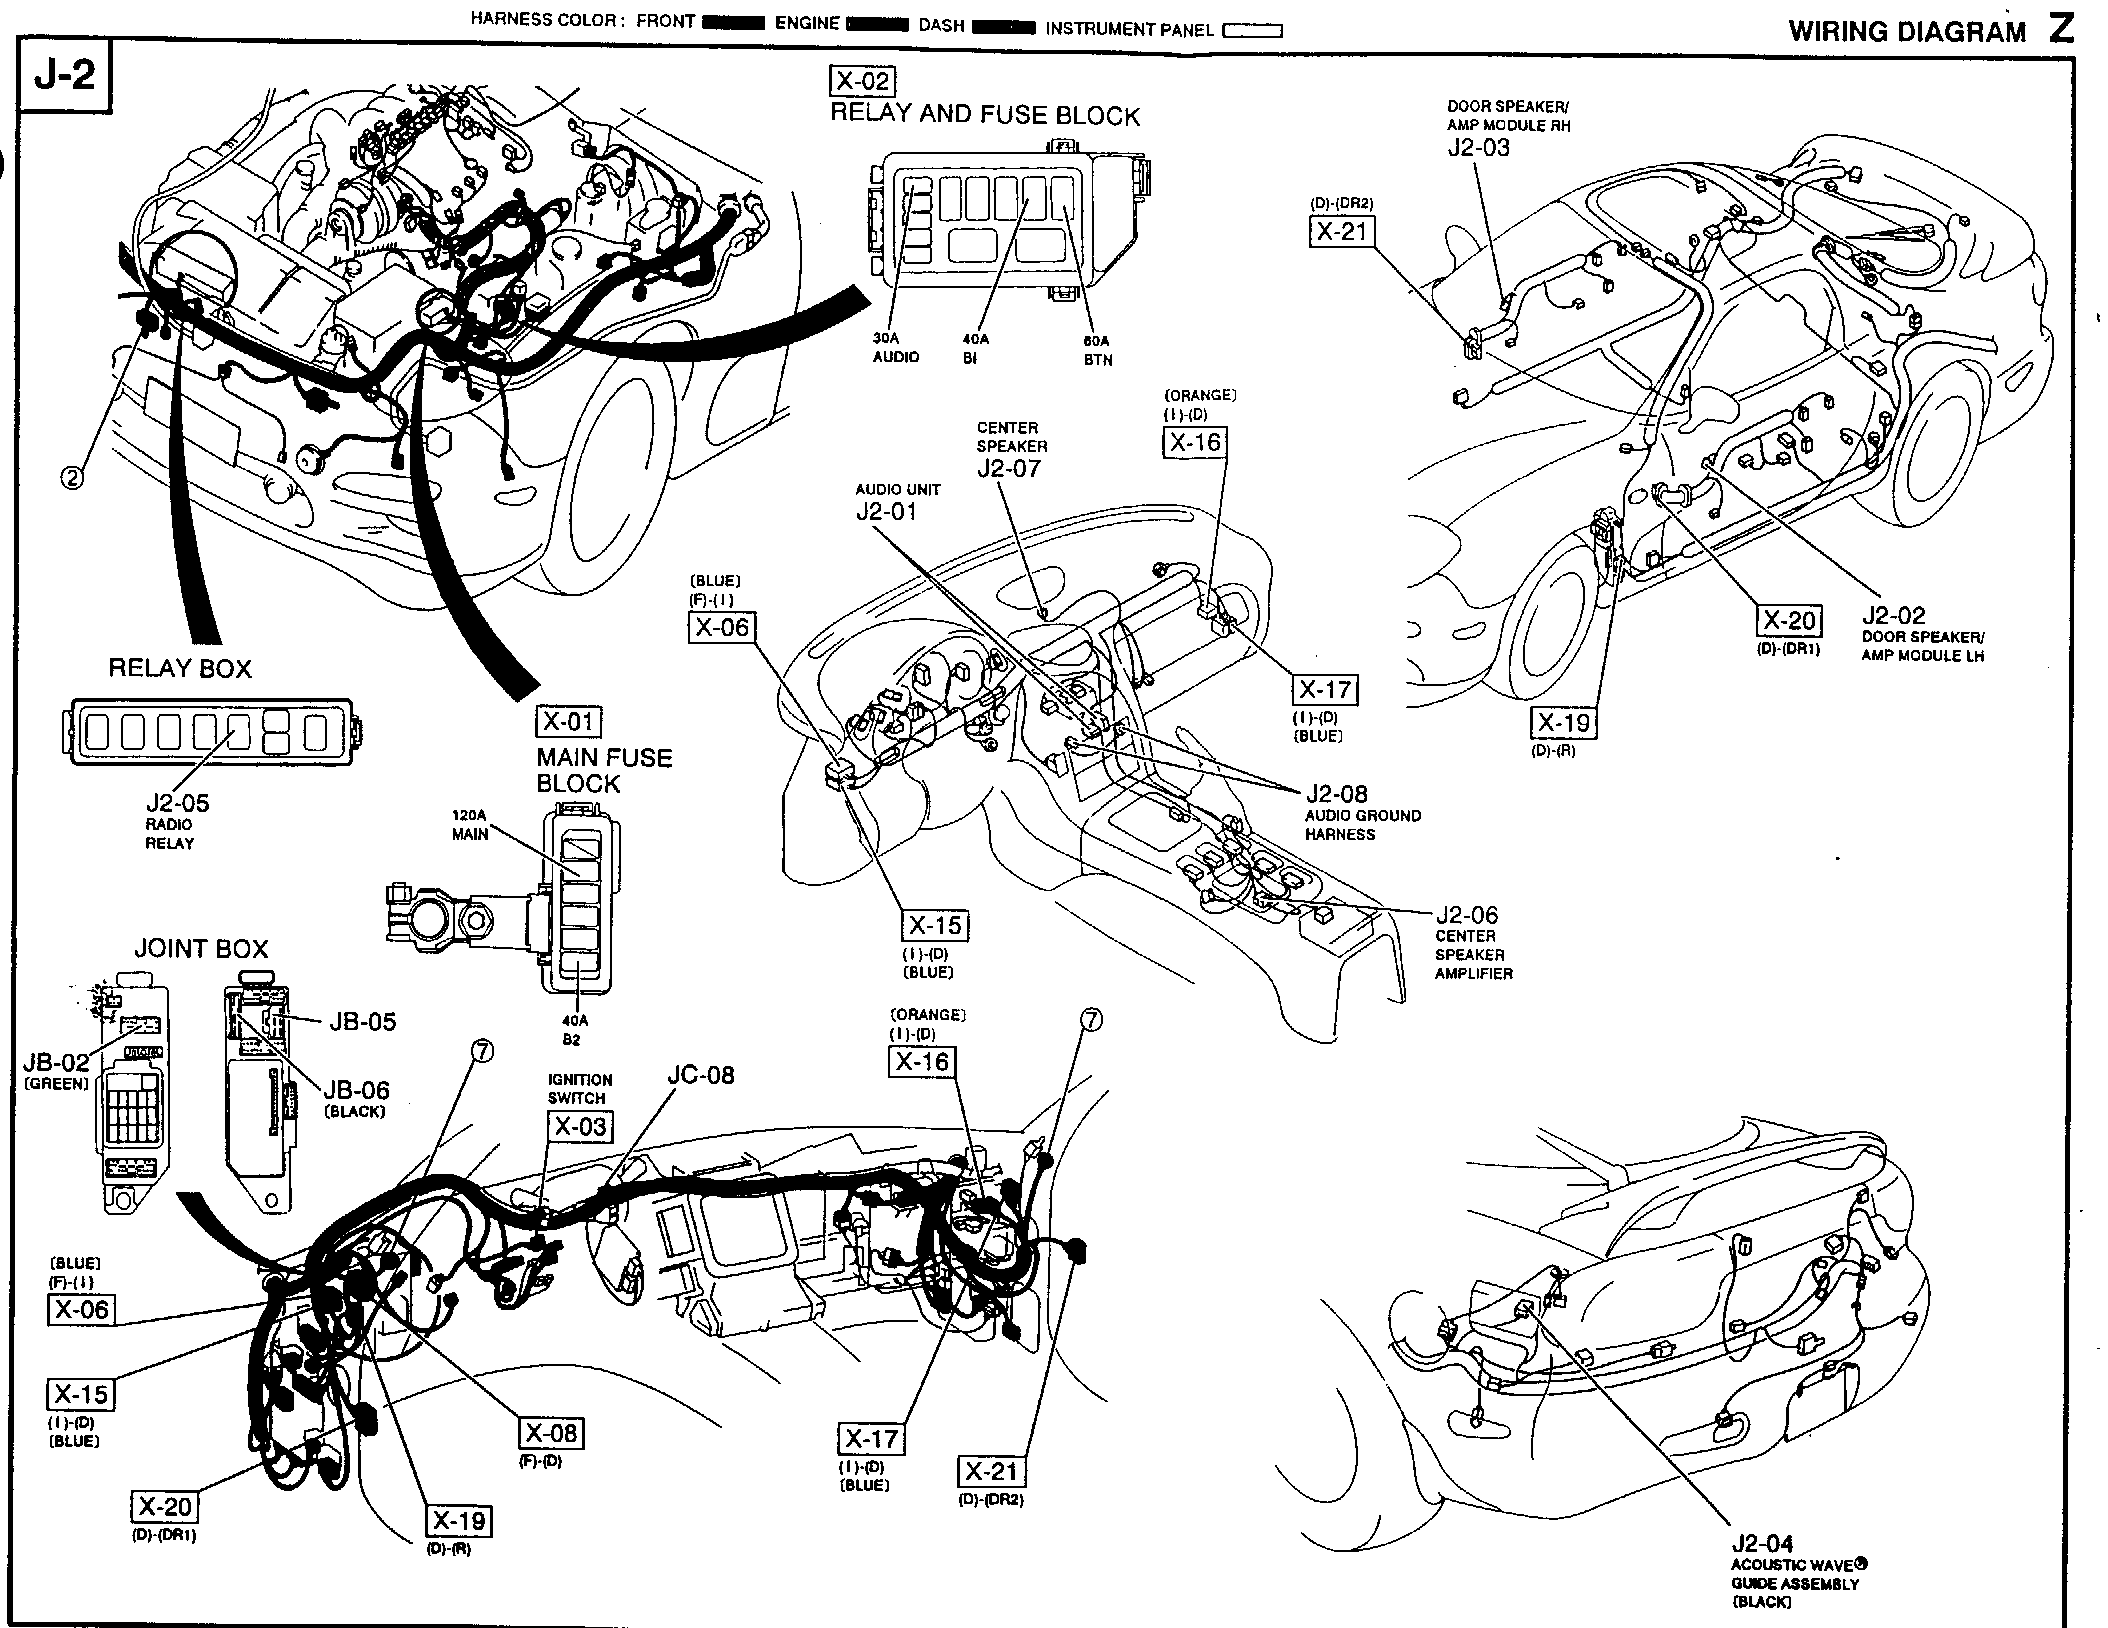
Wiring Diagram for Bose Stereo
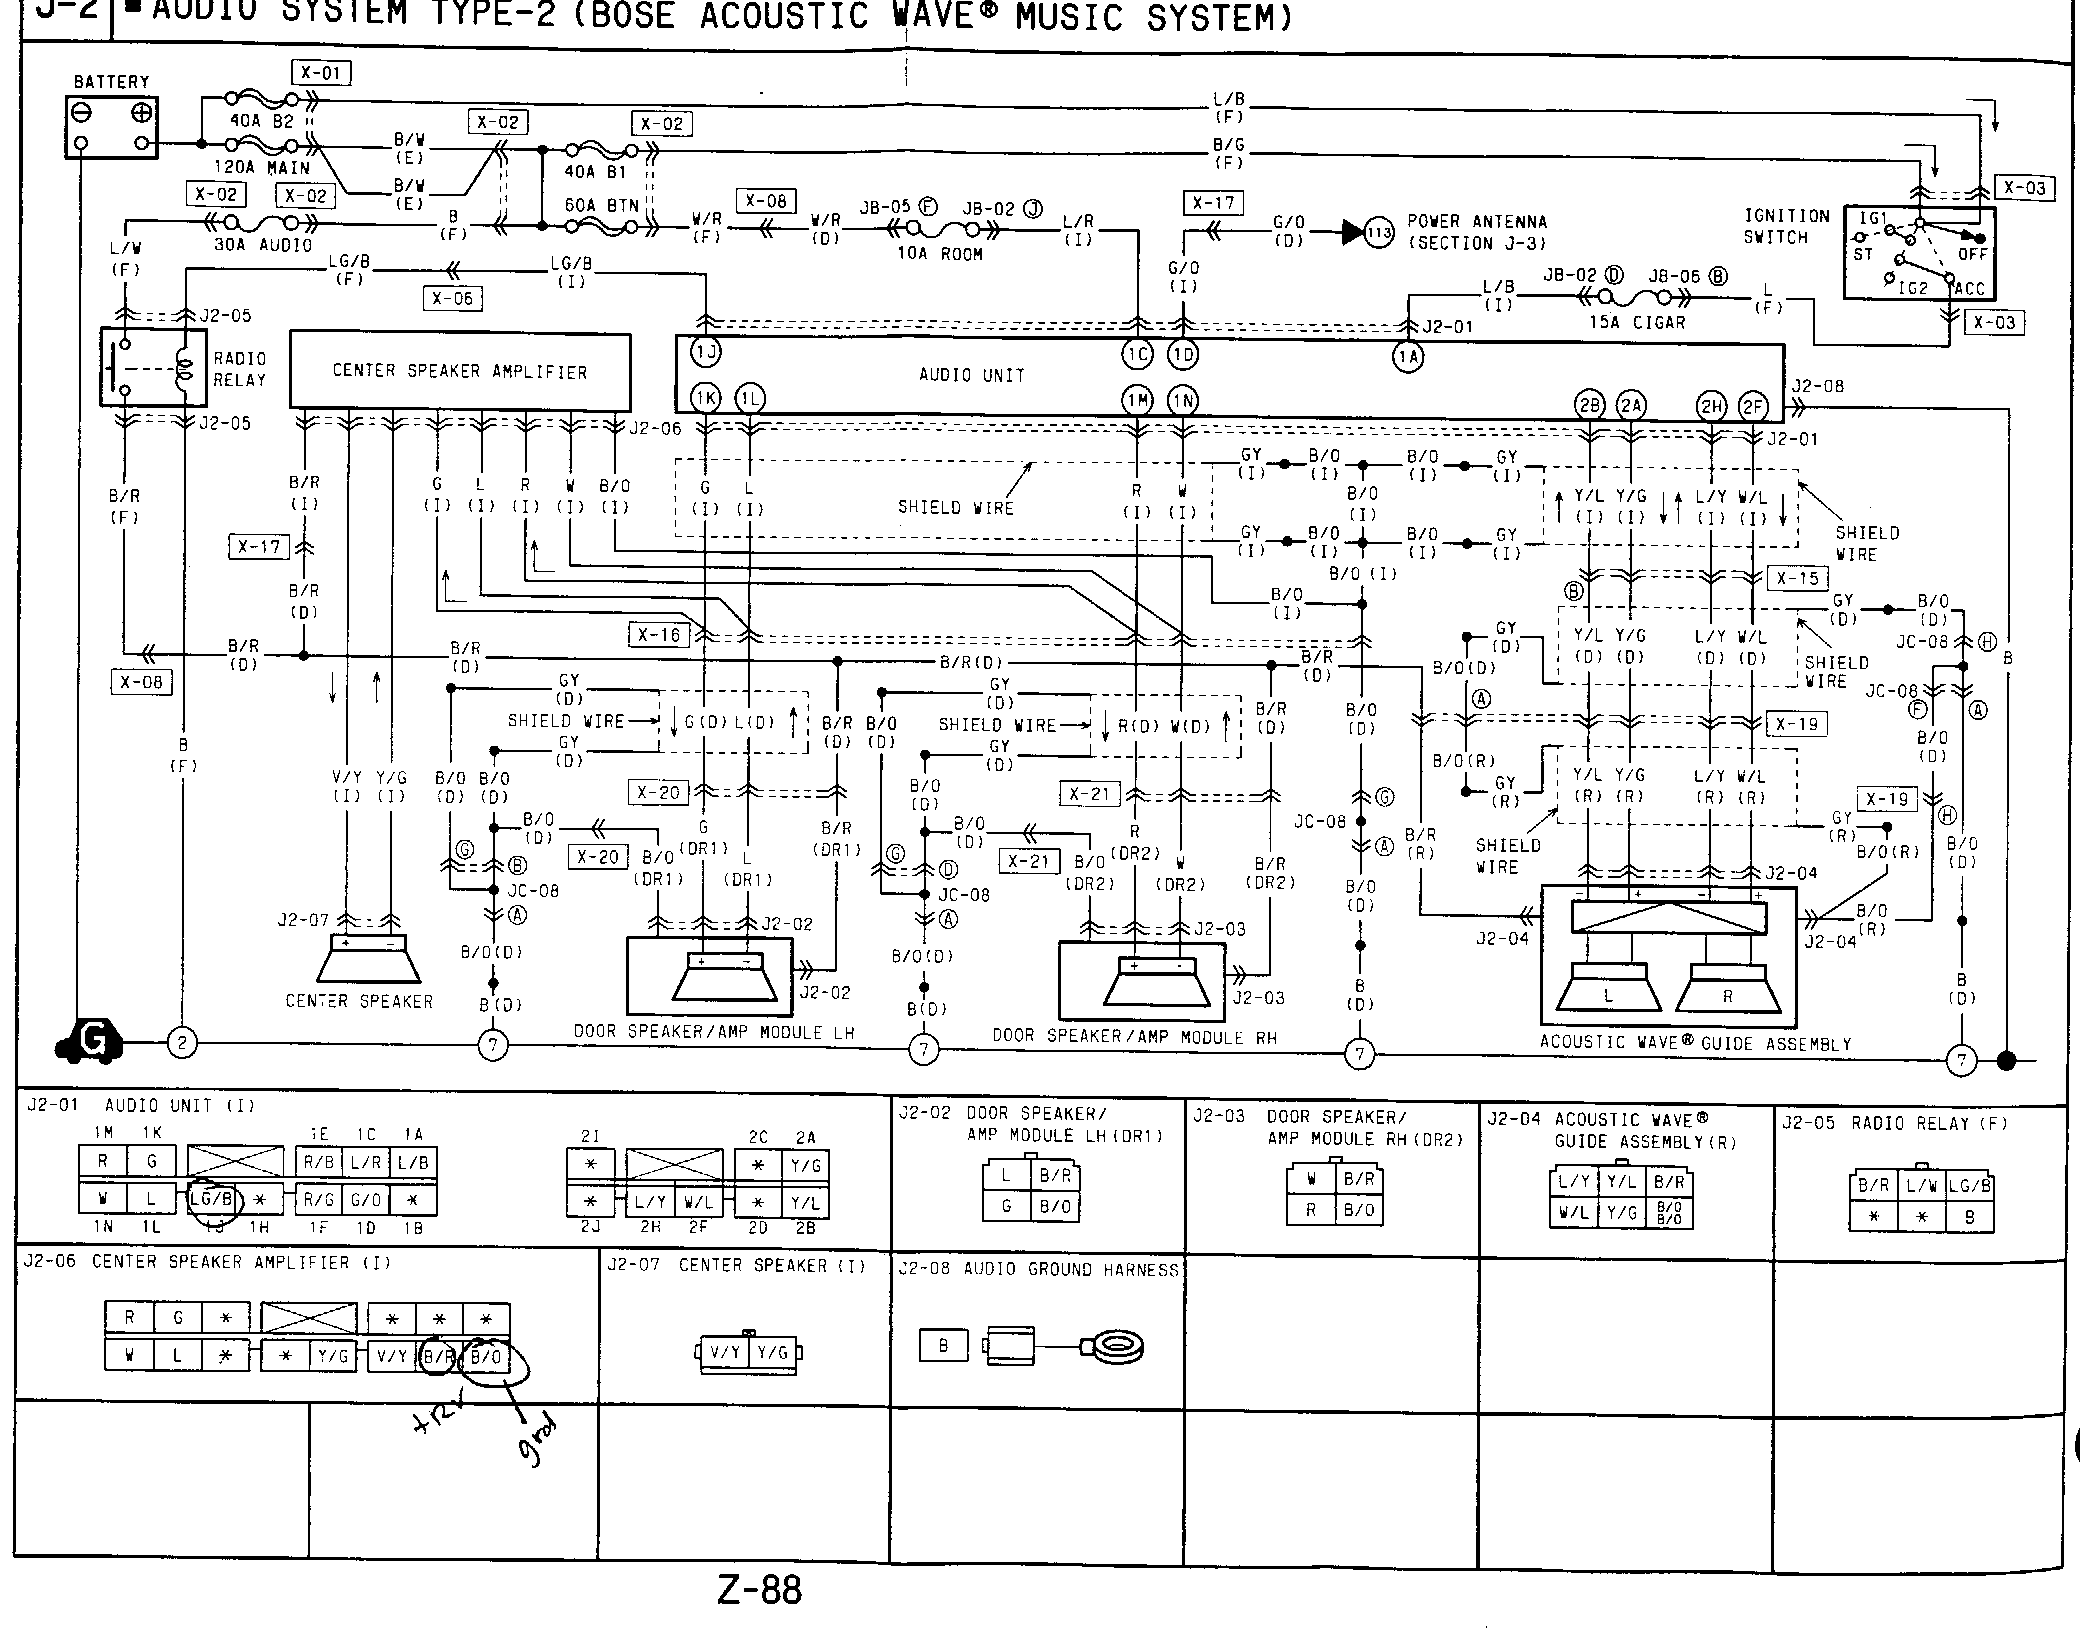
Wiring Schematic for Bose Stereo

![[ Mail me ]](mail.gif)
![[ To RX-7 Files home ]](rx7_home.gif)
![[ To my home page ]](my_home.gif)
![[ Copyright Notice ]](copyright.gif)