
Suspension Installation Instructions
Last updated: May 2, 1998
INTRODUCTION
I installed all of the components at once - shocks, springs,
anti-sway bars, and anti-sway bar braces. To install just
one of these, check inside of the directions below. It was easier
to just do the whole thing at once, as the springs/shocks
required the anti-sway bars to be removed most of the way.
The bars could be done separately without having to do anything
with the springs. To just do the shocks OR springs, you will
have to take the other off as well. So you might as well
replace both at the same time.
This is actually a pretty simple procedure. Do not let all
the detail in this procedure throw you off. I did it with just
the diagrams in the shop manual to go on, plus one diagram that
Tri-Point sent me with the Penskes. I added a lot of detail here in my
procedure, as there are some steps that are much easier to do one
way than another. I found out the hard way. If you do these in
order, it should go a lot easier. And it was pretty easy even
doing it the hard way.
I installed the rear components first, as it seemed a little more
straight forward (less parts). After doing the whole thing, I
don't think it makes any difference which you do first.
Portions of this are specific to the Penske shocks, so determine
what applies to your installation if you are not installing these.
I tried to mark these steps and tools with an asterisk (*).
PARTS
- Penske Shocks and Eibach Springs from Tri-Point
- Tri-Point Tubular Front Anti-Sway Bar
- Tri-Point Solid Rear Anti-Sway Bar (made by Racing Beat)
- * Tri-Point Front Anti-Sway Bar Braces (longitudinal)
- * Racing Beat Front Anti-Sway Bar Brace (lateral)
ADDITIONAL PARTS
- * Plastic zip ties (very large ones) (Note: several smaller ones
can be used in place of one large one by zipping them together.)
- Lithium-based grease (this is the standard stuff you get for grease
guns - I used the Valvoline Synthetic)
- Grease fittings (optional)
TOOLS
- The usual suspects - socket set, wrenches, torque wrench, etc
- * Allen wrenches
- Spring compressor
- * 1/2" cobalt drill bit (or as hard a bit as you can find - I went through 2 of
the regular metal bits and 2 of the cobalt ones)
- * Dremel tool or rat tail file
INSTALLATION
REAR SUSPENSION - DISASSEMBLY
- Jack up the rear of the car and set it on jackstands.
- Remove the wheels.
- Remove the rear strut tower brace. The three bolts that attach are fastened
to the studs on the top of the shock assembly and hold that unit in place.
- Unbolt the anti-sway bar end link from the bar itself before attempting
to remove the bolt at the bottom of the shock. This will make it easier to
get the bolt out of the bushing. (If you are going to replace the
anti-sway bar, you might as well remove these at this point anyway.) Remove
the bolt at the bottom of the shock.
- If you are replacing the anti-sway bar, finish removing it at this point. There
will be two bolts at each side that attach the mounting brackets to the frame of the
car.
For more detailed information on removing and installing the anti-sway bar mounts,
see the page on the Widefoot mounts.
- With the strut tower brace removed at the top, and the anti-sway bar end link
bolt removed at the bottom, the shock is not free, and can be removed from the car.
Pry down on the upper control arm, and the shock will pull free.
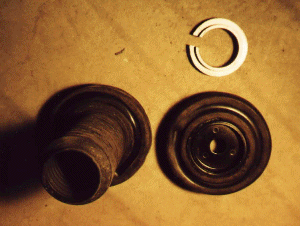
- Once you have the springs/shocks out, use the spring compressor to
disassemble them. (Shown to right.) The stock top rubber mount and rubber washers
will be re-used.
REAR SUSPENSION - ASSEMBLY
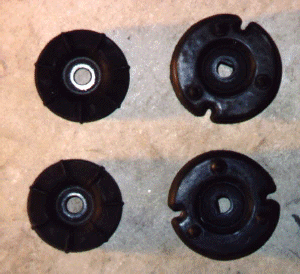
- * Remove the stock top rubber mount. This is the big rubber donut with the
accordian-like sleeve on it.
The directions I got from Tri-point said to trim it, but I found that it serves no
useful function, and it squeaked against the new spring perch. I confirmed this with
Tri-Point, and they said it should just be removed. Just in case, here is what I
had written on trimming it:
Cut off the accordian-like boot at the
base of the metal plate inside the bottom of the mount. The top locator of
the Penskes will sit inside the lip of the metal plate. Use it to determine
how much of the boot will need to be trimmed. Trim just enough so that the
locator will sit flat inside the metal plate.
The stock mount is shown in the photo to the below and to the right. It
is the one on the left of the photo. The trimmed mount is in the same photo,
on the right. The locator is shown there also, at the top on the right.
- * Drill out the two stock rubber washers (shown to the right) on each
shock with a 1/2" drill bit. These have extremely hard metal inside, so
use a cobalt bit or other bit designed for this. (I ended up going through
three cobalt bits for the fronts and the rears.) A drill press helps a
lot but is not absolutely necessary for this operation. Clean up the
holes with the Dremel tool w/ sanding attachment or a rat tail file.
NOTE: Be very careful in drilling these; mine rattle on the shock rod since my
holes ended up being a little bigger due to the drill rattling in the hole since
the material was so hard. I get sort of a jingling rattle from the back of the
car and I pretty sure this is what it is. You may want to consider having a machine
shop drill these it is such a pain in the butt.
- Assemble the new shocks/springs, using the stock mount (with rubber donut removed)
and lower rubber washer. Tighten the 1/2" nut at the top of the shock down to the torque
listed in the shop manual. (WARNING: this is NOT the small nut that is part of
the top of the shock - that is the compression adjustment. The compression adjustment
nut has small holes in it.)
- * Use the bump stop that came with the Penskes, not the stock one. This is the
large white rubber/silicone piece on the shock rod (inside the spring).
- If you are replacing the anti-sway bars, assemble the new bar. Grease the
urethane bushings with lithium grease. (I used Valvoline Synthetic.) Just
grease the inside of the bushing, no need to do the outside where the bracket will sit.
Urethane bushings will squeak really badly if you do not grease them.
Install the urethane bushings on the bar and put the stock mounting brackets on the
new urethane bushings. Install the locator clamps (but do not tighten yet). Put
the new bar on the car, but do not bolt it into place yet.
- Optional step - add a grease fitting to the rear urethane anti-sway bar
bushings. Drill a 1/4" hole in the metal bracket, through the bottom (this is the round
side of the bushing, and it will point down when it is installed on the car. This
will be the highest point of the bushing that points up if you lay it flat on the
ground.)
Insert the bushing in the bracket, and drill a 1/4" hole through the one you
just drilled in the bracket, entirely through the bushing.
Note: I used 1/4" standard grease fittings; you may get a different size.
Drill the appropriate hole.
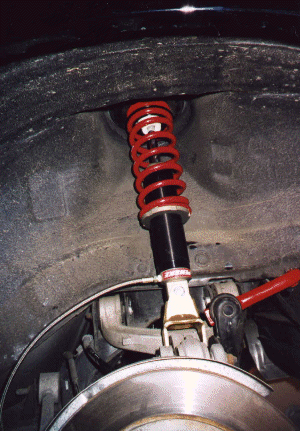
- Install the shock/spring by locating the three studs on the top mount in
the holes in the body.
- * The braided steel line for the external resovoir should point toward the rear
of the car. (Note: before I called Tri-Point for clarification on another issue,
I had already installed mine with them pointing towards the front. They said this
was perfectly fine, but they usually install them towards the rear. I actually
prefer the front, as it keeps the resouvoir away from the heat generated by the
exhaust. You can always unbolt the bottom of the shock and rotate it the other
way.)
- Put the top rubber washer over the shock rod. Position the rear strut tower brace
and install the three nuts on top of the studs, but do not tighten. This will keep
the shock from falling down while positioning the lower mounting bracket.
- Fasten the lower bracket of the shock into place with the bolt on the end of the
anti-sway bar link. Torque down to the specs in the shop manual. Note: you may have
to tighten the 1/2" nut at the top of the shock down to get it to go up enough so
that the bottom can be moved into position.
- Once the lower end has been installed, finish tightening the three nuts on the
studs. Add the two 1/2" washers and 1/2" nut to the shock rod, and torque down.
- Repeat for the other side.
- * Route the steel line for the external resouvoir through the suspension links in
such a manner that it will not rub on anything or get pinched when the suspension
moves.
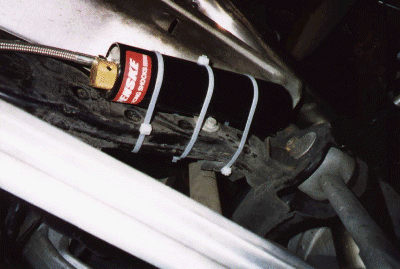
- * Attach the external resouvoirs to the frame of the car using plastic zip ties.
(Shown to the right.) Use at least three ties per side. Also
zip tie the braided steel line to the frame of
the car (but not tight enough to squeeze it). The line should not project past the
center of the shock, i.e.- it should not stick out towards the tire. The resouvoir
should be positioned so the filling valve is two inches or so away from the bushing
for where the lower suspension arm mounts to the frame of the car.
- Complete the installation of the anti-sway bar by attaching the end links to the
bar and tightening the nut. Then bolt the bar to the frame of the car. The bar
should rotate in the bushings. If you tighten it too far it will not. The urethane
bushings may be a little bigger than the stock ones, so you may need to add a washer
or two between the mounting bracket and the frame. This should keep the bar loose
enough in the bushings. One washer worked for me. Tighten down the positioning
clamps on the bar.
- * Set the shock rebound adjuster on the external resouvoir to 3, and the compression
adjuster at the top of the shock to full stiff minus 1/2 to 3/4 turns. Full stiff is
where the nut is screwed all the way in (clockwise). Back it out to adjust. These
settings are starting points - adjust for your style of driving.
FRONT SUSPENSION - DISASSEMBLY
The front turned out to be easier than the rear, maybe because I had some practice
doing the rears first.
- Break loose but do not remove the lug nuts.
- Jack up the front of the car and set it on jackstands.

- Finish loosening the lug nuts and remove the wheels.
- Remove the brake line from the shock. It is held in place by a clip that
pulls out. Remove the ABS sensor.
- Remove the two bolts that attach the upper control arm to the frame of the car.
It is not necessary to remove the last bolt attaching the arm to the hub assembly.
- Note: If you have problems with the bolts at the bottom of the shock and the anti-sway bar
hitting the steering control arm, turn the steering wheel. At first I thought I was going
to need to drop the control arm because some idiot at Mazda had put the bolts through the
wrong way and then installed the control arm after that. Turns out the idiot (me) just needed
to turn the steering wheel. If you center the steering wheel before you start you may
not even run into this issue.
- Remove the front strut tower brace. The three bolts that attach are fastened
to the studs on the top of the shock assembly and hold that unit in place.
- Unbolt the anti-sway bar end link from the bar itself before attempting
to remove the bolt at the bottom of the shock. This will make it easier to
get the bolt out of the bushing. (If you are going to replace the
anti-sway bar, you might as well remove these at this point anyway.) Remove
the bolt at the bottom of the shock.
- With the strut tower brace removed at the top, and the anti-sway bar end link
bolt removed at the bottom, the shock is not free, and can be removed from the car.
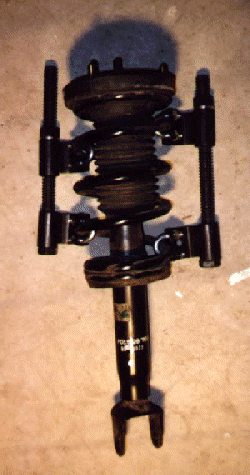
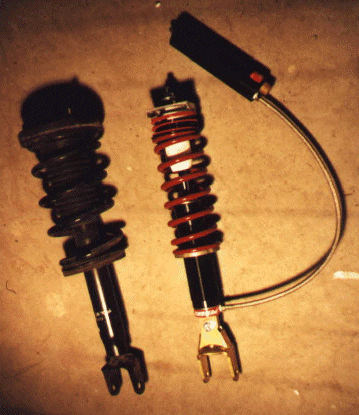
- Once you have the springs/shocks out, use the spring compressor to
disassemble them. The stock top rubber mount and rubber washers
will be re-used.
FRONT SUSPENSION - ASSEMBLY
- The best advice I could give you would be to loosely assemble everything before
tightneing anything down. There will be a lot of adjustments in terms of alignment
that will have to be made to get all the bolts and holes to line up.
- * This particularly applies to the anti-sway bar braces if you have the Tri-Point braces
and the Racing Beat brace. You will be threading the bolt through 4 layers if you use both
of these.
- * First position the Racing Beat brace with the bolts for the steering rack.
- * If you buy the optional Tri-Point anti-sway bar brace (they make this for MazdaComp),
note that the two sides are different. This will become obvious when you try to
bolt them in and they seem to be twisted too far up or down at the front. So position
them first before tightening the bolts down.
- * Install the Tri-Point braces over the top of the Racing Beat one. (This means that
the Racing Beat brace is sandwiched between the frame of the car and the Tri-Point brace.)
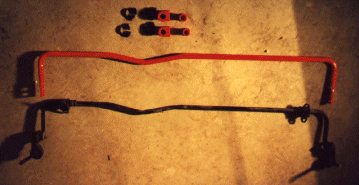
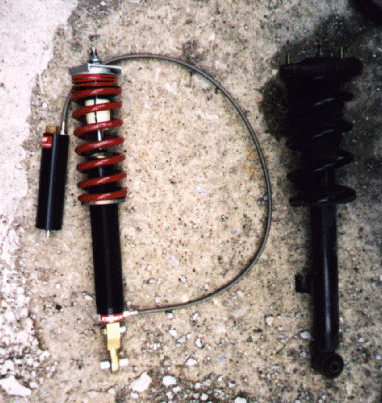
- After assembling the anti-sway bar, bolt it to the Tri-Point brace. Do not attach the
end-links to the A-arm yet. The following pictures shows everything installed. The
Racing Beat brace is the white one running laterally. The Tri-Point braces are the gold ones
running longitudinally.

The directions I got from Tri-point said to trim the rubber mount, but I found that it serves no
useful function, and it squeaked against the new spring perch. I confirmed this with
Tri-Point, and they said it should just be removed. In any event, it would not have needed to be
trimmed like the rear one anyway, since the boot is a separate piece.
- * Drill out the two stock rubber washers on each shock with a 1/2" drill
bit. These have extremely hard metal inside, so use a cobalt bit or other bit
designed for this. A drill press helps a lot but is not absolutely necessary for this
operation. Clean up the holes with the Dremel tool w/ sanding attachment
or a rat tail file.
- Assemble the new shocks/springs, using the stock mount (with rubber donut removed)
and lower rubber washer. Tighten the 1/2" nut at the top of the shock down to the torque
listed in the shop manual. (WARNING: this is NOT the small nut that is part of
the top of the shock - that is the compression adjustment. The compression adjustment
nut has small holes in it.)
- * Use the bump stop that came with the Penskes, not the stock one. This is the
large rubber piece on the shock rod (inside the spring).
- If you are replacing the anti-sway bars, assemble the new bar. Grease the
urethane bushings with lithium grease. (I used Valvoline Synthetic.) Just
grease the inside of the bushing, no need to do the outside where the bracket will sit.
Urethane bushings will squeak really badly if you do not grease them.
Install the urethane bushings on the bar and put the stock mounting brackets on the
new urethane bushings. Install the locator clamps (but do not tighten yet). Put
the new bar on the car, but do not bolt it into place yet.
- * I bought the optional Tri-Point anti-sway bar braces, so I do not use urethane
bushings. Just grease the inside of the bushings that come with these. (Tri-Point
said that even these do not need to be greased.)
- Optional step if you do not buy the Tri-Point anti-sway bar braces - add a grease
fitting to the urethane anti-sway bar bushings. See the instructions above for the
rear anti-sway bar.
- * The braided steel line for the external resovoir should point toward the front
of the car.
- Position the lower end of the shock first. The directions said to use a punch
and hammer to push the spacer in the lower control arm back out a little. This
did not seem to work too well. It is just a pain to do.
- Position the top of the shock/spring by locating the three studs on the top rubber
mount in the holes in the body. You will also have to position the top A-arm at the
same time. This is kind of a pain also.
- Put the top rubber washer over the shock rod. Position the strut tower brace
and install the three nuts on top of the studs, but do not tighten.
- Add the two 1/2" washers and 1/2" nut to the shock rod, and torque down.
- Repeat for the other side.
- Finish tightening everything down.
- Attach the anti-sway bar end links and tighten down.
- * Since the Penskes do not have the bracket for the brake line clip, zip tie it
to the shock or other location where it will not be pinched, ripped out, or otherwise
affected by the travel of the suspension. Be careful not to overtighten the tie or
pinch the line with it.
- * Route the steel line for the external resouvoir through the suspension links in
such a manner that it will not rub on anything or get pinched when the suspension
moves.
- * Attach the external resouvoirs to the frame of the car using plastic zip ties.
Use at least three ties per side. Also zip tie the braided steel line to the frame of
the car (but not tight enough to squeeze it, just to keep it where you want it). The
line should not project past the center of the shock, i.e.- it should not stick out
towards the tire. I placed the resouvoir on the sides of the plastic panel underneath
the engine.
- * Set the shock rebound adjuster on the external resouvoir to 5, and the compression
adjuster at the top of the shock to full stiff minus 3/4 to 1 turns. Full stiff is
where the nut is screwed all the way in (clockwise). Back it out to adjust. These
settings are starting points - adjust for your style of driving.
POST ASSEMBLY
- Take the car for a short drive. Check the torque on all bolts/nuts.
- * Make sure the steel lines for the shock resouvoirs are not being pinched
or binding. Make sure the resouvoirs are still positioned correctly by the
zip ties.
- Get the car corner balanced and aligned. Alignment pecs posted
here. This is more or less mandatory
after installing coil-overs, and will make a world of difference.
Make sure that the shop does it with you (or equivalent weight) in the driver's
seat, and the amount of gas in the tank as you will be running with.
- At the same time as aligning and corner balancing, adjust the anti-sway bar to
get rid of preload (this must also be done w/ your weight in the seat).
- You may also need to align the headlights since the car's height will
more than likely change.

If you do not currently have a spring compressor, you have four options:
- Buy the compressor. I got mine for about $50 and it is way overkill
for what it would take to do the job. It is basically two large bolts,
probably about 5/8 threads, and two brackets per bolt that have u-bolts
that slip around the spring coils. I think $50 is way too high for this
- maybe $20 would be reasonable. There should be cheaper ones out there,
especially if you buy mail order from a tool company.
- Buy the parts and make your own. The one I bought is probably about
$15 worth of parts, but as a kit they get $50. I was in a hurry and
didn't want to waste the time getting all the pieces.
- Take the used and new springs/shocks to an auto parts store and have
them change them for you. I don't know how much this costs, but some places
will do it for free if you buy the new parts from them. I chose to apply the
cost of this towards the spring compressor since I am sure I will use it
again at some point.
- You might also get lucky and be able to borrow a spring compressor from
the auto parts store. Some places will loan them with a deposit.
[Mail me]
[To RX-7 Files home]
[To my home page]
[Copyright Notice]