
Pretty simple... polishing only really works well on aluminum, but requires upkeep. Magnesium, for example, will oxidize much more quickly, and you will constantly need to touch up the finish unless you have it powdercoated with clear. Aluminum only needs touch up every once in awhile, but will require that you maintain it to maintain the shine.
(Editor's note: Eastwood sells a clear coat resistant to petroleum products for over polished parts. --Steve)
Powder and/or ceramic coatings are an alternative. You can get a ceramic finish on your intake manifolds that closely resembles polished, doesn't require upkeep or as much upkeep, and has the fringe benefit of coating the piece with a thermal barrier, keeping heat out of the intake (for example). The piece is grounded and positively charged powder is sprayed onto it, resulting in very uniform coverage. On something like the 13B-REW upper extension manifold, where the surface is slightly bumpy as cast, it will smooth in (but not perfectly) the surface and the result is a "like-polished" part.
Powder and ceramic coatings are available in a range of colors (powder is available in a wider range) and you can mix and match. You can do a "chrome" base coat and then do a candy blue over it, for example, for a custom finish.
It's expensive if you are not doing a number of pieces at one time, since they like to use their booths for one color at a time, and switching over for one piece is cost prohibitive. If you can get in on someone else's color (ask 'em what they currently have set up) it's cheaper. For example, if they're doing a big lot of parts in black, you can piggyback for cheaper rather than forcing them to switch over to red for your part only. The parts are baked after coating, and the material "sets" into a very durable, (usually) high-gloss finish.
Plating also grounds the part and uses a positive charge to cause material to adhere to the surface of the part, but in this case, the materials are metallic in nature. Chroming a part results in a deep shine, makes the part very easy to maintain (Windex window cleaner and a paper towel are all it takes to shine it up again, as opposed to rubbing with your favorite brand of aluminum polish). It does add weight to the part, which can actually be somewhat significant, if that's one of those things you care about. Chrome plating a wheel can easily add a pound or two to the weight of the wheel, depending on how much material was added.
The main difference between all of the above are the cost, the method of maintenance, and the look of the finish.
Polished aluminum costs, because of the detail work involved. It could easily cost you as much as $200 (I know from personal experience) to polish just the upper intake extension manifold for the FD, unless you have a bulk job, or can get your parts sent in through a vendor who has a good relationship with the polishing shop. My rotor housings, for example, only cost $75 each, and the front cover was $125 when sent in through a local vendor, but the water pump, the upper intake manifold, and the lower intake manifold all cost me $200 each.
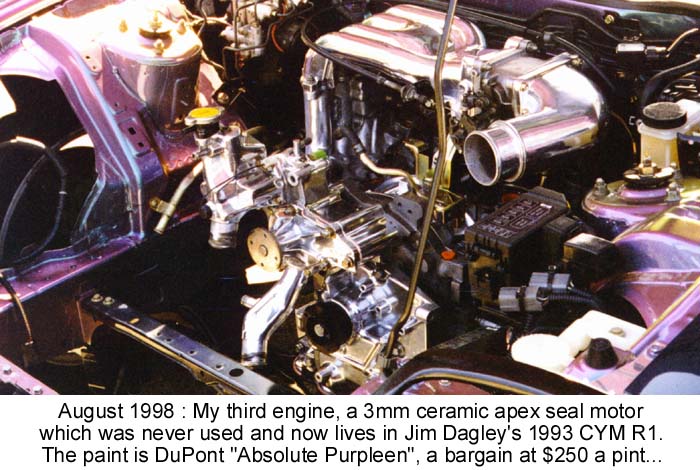
Here's the motor this was done for...
Keeping the shine requires elbow work every so often, and can be a pain. The finish is brighter, in my opinion, than either of the other two options.
Powder or ceramic coating will create a nearly smooth finish, and in the case of "cermachrome" (or whatever the shop calls their chrome-like finish) will create a very bright finish, almost as bright as polished aluminum. The price can be high or reasonable, depending on how many pieces you have done, and again, on whether you can get in on someone else's batch, or go through a local vendor.
The finish is easy to upkeep, and requires little maintenance, but it will not be as bright as polished aluminum. To get (and keep) that look, you could have the aluminum polished, and then powder coated with clear. Spraying polished parts with clearcoat enamel doesn't work well, because the material has very little to stick to. In an engine environment, it can also yellow, and with repeated heat cycling, may crack. I wouldn't recommend it as an option.
The problem with powder coating is that it is difficult to do this on a part which has a mechanical component (like a ball joint in a suspension arm) that might require replacing after the piece is baked. It is also possible that some parts will not retain their original dimensions after being sandblasted to prep for the application of the powder coat, also. This is usually only a concern with thin wall material, like a part fabricated from thin wall mild steel tubing, for example.
And finally, there's chrome plating. Chrome is very easy to maintain. If done well, it has a very nice finish, but where polished aluminum will have a bright, almost white tinge to it, chrome (in my opinion) has a deeper, bluer tinge. Depends on what you want. The cost may depend on the size of the batch, but should be pretty standard depending on the size of the part to be plated. Prep should be roughly the same as powder coat, as far as the sandblasting of the surface in preparation for bonding of the metal, so you have the same things to watch out for.
And that's about all I have to say about that. :)
_________________
Date: Sun, 28 Jan 2001 10:14:45 -0600
From: "David Canitz" (nitz@wt.net)
Thanks Jim for your inclusive descriptions.
A fourth alternative is anodizing for aluminum parts.
Observation: Although many 'hot rods' chrome suspension parts, I tend to agree with Joe about embrittlement using chrome processing.
I would be leery of driving in competition any car which has had suspension components chrome plated. The chemical chrome process leaves a hard 'shell' around say, a upper control rod. The actual control rod could have a 'subsurface crack' that will not show up in the hard chrome shell outer. I will not chrome any suspension piece. Same would go for a powder coated suspension rod that is in stress.
I've found the powder coating and ceramic coating done by Polymer Dynamics (Houston, 713-694-3296) to be very resistant to all forms of chemicals. What problems have you had or are referring to?
I have used it on turbo exhaust housings and exhaust systems, intake and exhaust valves, piston skirts, piston crowns, intake head combustion chambers, compressor housings, intercoolers, valve covers, intercooler tubing, wheels, coilover springs, and an entire tube frame SCCA GT3 car.
The stuff on the frame resists brake fluid, heat, oils, fuels, brake cleaner, rocks, tire rubber, degreaser........
I have also used Polymer Dynamics dry film lubricants on bearings, rods, cranks, etc. Recommend it for anyone putting together engines, gear boxes and differentials.
I do not have experience on polishing. I try to make it go faster and not real concerned about 'how pretty' it looks. Money only stretches so far.
_______________
From: "Carlos A. Iglesias" (Rotary@san.rr.com)
Sent: 01 January, 2001 10:03 AM
Here's a couple of personal observations about durability of coatings. Sorry, no quantitative performance numbers:
TURBOS: Fagettaboutit ! Between my Jacksonville amigo, Dean Colver and I, we've now gone through three different attempts to coat the turbos exhaust sections, and none of the (hi temp) coatings have come close to standing up to the heat. They all disintegrate within a couple of thousand mile. This includes BCE's Stainless Ceramic and Swain's White Lightning on my car, as well as JetHot 2000 on Dean's car. That adds up to well over a $1000 is coating failure, so if I ever find the a coating that holds up to our turbo rotary infernos, I'll be it's unrelenting herald in the RX-7 community.
ROTOR FACES: After on approximately 5k miles, Swain's "piston" Coating had moderate flaking on most of the rotor faces. The part that stays on is good for cleanup, but personally, I'd rather spend the $350-$400 that Swain would charge on upgrading my oil coolers or radiator. Atleast I know that that will last.
DOWNPIPE/MIDPIPE: 1600F coatings are sufficient. The White Lighting is VERY thick and provides the best barrier here.
TECHLINE COATINGS: I've used the DIY Cermakrome coating extensively on none exhaust exposed components, and I am very happy with it. I've even used it on the turbos heatshields, and it has help up In my eternal optimism, I've ordered their 2000F Black Satin to try on my new turbos. Atleat at $50, there is little to loose. They also have a special "extreme heat" coating call MCS that they only sell to professsionals, but if this Black Satin falls by the wasteland of the rotary inferno, I may try to convince them to sell it to me. I think my ability to promote the product would make it worth their while.
NON-EXHAUST: If you're looking for a professionally applied, hi polish coating that is not part of the exhaust system, I'd recommend BCE or Airborne. Both have ceramic coatings with near chrome finishes.
Date: Tue, 24 Feb 1998 20:43:18 -0500 When I pulled my manifold off to replace my rubber vacuum hoses with
silicone I decided to polish the manifold (and rear turbo inlet pipe). It's
not easy but it looks great and I got a lot of satisfaction in doing it
myself. I'm now eyeing my GReddy intercooler and wondering how tough it
would be to polish the top of it. Some safety notes: You must wear safety
glasses and a dust mask (aluminum dust is bad for you). I also recommend
wearing ear plugs because you will be using the drill for long periods of
time to sand down the metal.
You will need:
Bright Works can be reached at their web site: www1.minn.net/~bright-1 and
(612) 429-4439. They sell a good book and video on metal polishing.
I started by using 40 grit (course) sandpaper on a 5 inch wheel in my
drill. This will take off the rough sand cast finish on the manifold and
remove the casting ridges from the sides of the two outboard intake tubes.
I used a small 40 grit, 3/4 inch sandpaper drum to get to areas that I
couldn't reach with the 5 inch disk.
I then moved up to 80 grit (medium) sandpaper and went over the entire
manifold. Do the same with the 180 (fine) disk. If you encounter an
imperfection that you can't remove with your current grit, go back to a
heavier (lower number) grit sandpaper and remove the blemish. I used some
conical sandpaper drums (available from Bright Works in many grits) to get
to the hard to reach areas.
Next I used sandpaper sheets and hand smoothed the manifold by wrapping the
sandpaper around a foam sanding block. You will need to step down from 120,
180, 240, 320, 420, and finally 600 to get the metal smooth enough for
final polishing. This is time consuming. It took me about 5 hours for all
of the sanding (drill and hand).
Polishing the metal was easier than I expected. The key is to make sure you
have a consistent 600 grit finish on your aluminum part before you start.
Any scratches or imperfections visible will still be visible after
polishing, it will just be a shiny imperfection.
I used two, 6 inch polishing wheels that I got from ACE hardware
(Dico #26 for the tripoli, #36 for the white rouge). The back side
of the Dico polishing wheel package has a list of suggested wheels
for the two rouges. You must use two different wheels for the two rouges.
Keep the manifold at room temperature or warmer. This is important, the
rouge will goop up if the part gets cool. I used a propane heater in the
garage to keep the parts warm. Gently put the stick of tripoli rouge
against the rotating polishing wheel for a few seconds to transfer the
rouge to the wheel. Begin polishing the manifold with the polishing wheel.
Don't push so hard that the wheel slows down a lot. Be careful here, the
wheel will grab unexpectedly and can propel the part or the drill across
the room. The polishing wheel will also grab onto sharp edges, so go easy.
Mounting the polishing wheels on a bench grinder is an option that works
well but there are times when the drill mounted wheels are easier to
maneuver. Reapply the rouge every couple of minutes. Keep going over the
part until you get a good shine. I used my Dremmel tool with a conical
shaped felt bob to polish the hard-to-reach areas. You will need two
separate bobs for the two polishing rouges.
When you have a good, chrome-like shine, clean the part with a cloth
and switch wheels/bobs and use the white rouge to bring out a mirror-like
shine. You have to clean the part thoroughly before you move to the white
rouge.
When you use a polishing wheel after it hasn't been used for a few hours
you must "comb out" the wheel by rubbing it against a wire brush. If you
don't do this you won't be able to polish the part to a shine.
This is hard work but the manifold (and turbo inlet pipe, intercooler
pipes, etc.) look great. It really changes the look of your engine
compartment. Good luck.
_________________
From Jay (styk33@yahoo.com) With any decent weld you should be able to grind the crown (top of the
weld) off. When grinding with the abrasive wheel your grind marks should
run perpendicular with the weld. That means with a disc grinder you should
run it up and down the weld bead.
Anyone taking a certification test grinds off the crown of the weld flush
with the metal. Then it is bent into a U-shape to see if there are any
cracks or pits in the weldment. Depending on which code they are using
depends on the size and amount of misperfections that are allowed.
In short, yes you can grind the top of the weld flush with the end tanks
of the IC.
FYI, I have an AS in Welding Technology and I am pursuing a BS in
Metallurgy.
_________________
From: Steve Cirian I can't answer this for 100% sure, but as part of polishing, you start with
really rough grit sanding cones and knock the texture off. Then work through
progressively finer grits until the metal is smooth. Then use jewelers rouge
and finally white tripoli. Then you polish it with a metal polish like Flitz
(e.g.- what you would use for silverware). Then clear coat it. Eastwood makes
kits that have all these items in it, plus buffing wheels. The intake manifold
kit is a good starter. Make sure you get the clear coat that will resist
petroleum products.
That should leave all parts with the same (smooth / chromelike) texture and
appearance. Now, if the metals are different types of aluminum to begin with,
then they may all appear shiny, but have a slightly different color. I
believe this should not be very noticeable.
_________________
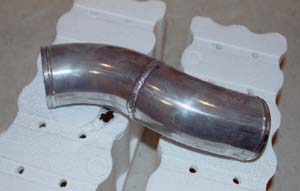
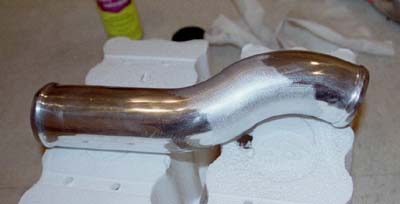
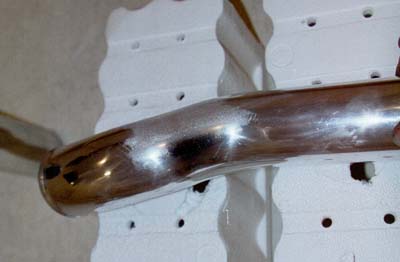
From: Steve Cirian I finally got around to polishing some parts on my car. The steps described by
Rob above are pretty much right on, and I have some pics to go with it:
Part before starting:
Step 1: grind down the welds.
Step 2: Sand off the grinding marks using medium paper (part shown after sanding):
Step 3: Use rouge polishing compound to take down the sanding scratches (note
that the sanding scratches are still on the top of the part, while the bottom is
polished):
Step 4: Use tripoli polishing compound to further polish and get rid of the
fine marks from the rouge. (Not shown, but even the swirl marks are starting to
go away after this step.)
Step 5: Use polishing paste to really shine the final finish.
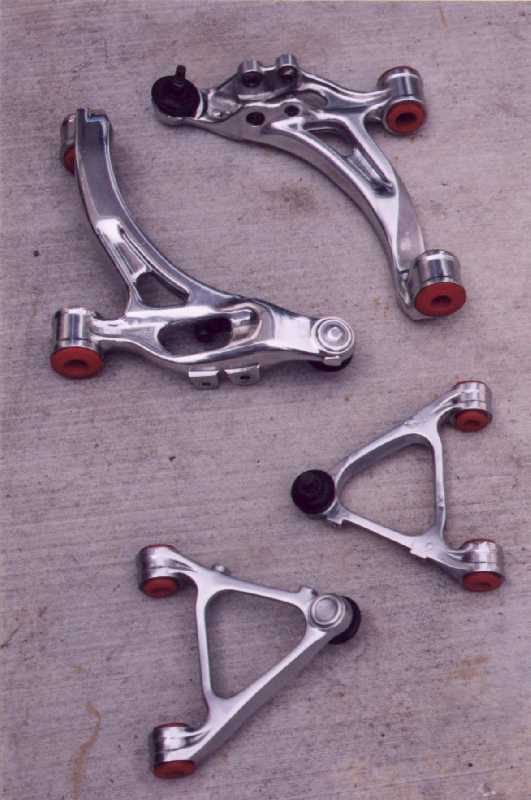
The photo below is of my car's front A-arms. They look a lot nicer than in
this photo, but it came out blurry and by that time they were back on the car.
--Steve
_________________
From: Wade Lanham I've been planning to re-polish my stuff and get it anodized. A
local place does it for $75 minimum, but I think they will do a fair amount
of parts before raising that price. They offer colors (like blue and red as
used with AN fittings) as well as just a clear, which should protect it but
leave it chome-looking. Even the colors still keep the chrome-look if it is
a high gloss anodization (not "flat"). There are different types of
anodization, so everyone would have to see some examples of the work his
local shop performs. Some is shiny, some is not, etc.
I would think an anodized finish would be more durable than a clear
coat. I don't know this to be true though, since I've never seen a clear
coated polished aluminum part before (and known it, anyway).
_________________
From: Hoskinson, Jeff" (jjhoskin@pscnet.com) I was warned by a few sources about getting cast AL parts anodized. The
grain structure on some cast parts is large and anodizing them might make
them turn grey.
_________________
Arizona Abrasive is a distributor of abrasives and specializes in buffing &
polishing supplies. They are in the process in putting together polishing kits
for aluminum, steel, and stainless steel. Established in 1956.
_________________
Date: Wed, 25 Feb 1998 21:36:36 EST Man, the polishing seem to be alot of work at home. I'd suggest paying a
professional motorcycle polishing place. I had a GReddy I.C. and pipes done
for a total of $70.00. See the
engine picture.
From: BruLewis@gnn.com (Bruce Lewis) I am not sure about the GTU Rims but I just finished with the BBS wheels supplied on
the convertible. These have polished alloy rims with a non polished silver insert.
The clear coat has aged and the rims looked like a satin aluminum. They also had some
areas where the clearcoat had been chipped by wheel weights and oxidation had
occured. I also wanted to redo the silver and change it to gold.
Here is the procedure I used.
1. Strip the clearcoat and silver paint with "Stripeze" paint remover. This is a
paste paint remover and does not run off the surface. Two or three applications
required.
2. Using 0000 Steel Wool and 800 - 1000 grit wet-dry sandpaper remove corroded areas
caused by wheel weights.
3. using "Mothers" aluminum and Mag polish remove any additional minor oxidation.
4. Polish with buffing wheel 4" and 6" on hand drill. Start with a ruge used to
remove minor imperfections then move to a white polishing ruge.
5. Another polishing with "Mothers"
6. Clean entire wheel with Acetone.
7. Paint with Silver or gold those ateas that are not polished.
8. clearcoat entire wheel.
Entire process takes about 4 hours per wheel.
Polished area is nearly crome like. Hope this helps.
___________________
Date: Thu, 16 Oct 1997 10:55:17 -0500 You might want to investigate the wheel refinishing kits
Eastwood has - you can request a
free catalog from their web page. They're pretty sharp kits, and they're
not too much (about $30-40 or so, does 4 wheels, if I remember right).
__________________
Date: Fri, 23 Jan 1998 00:32:28 -0500 The center caps of my wheels were beginning to show through the black
plastic that they really are so I decided to pop them out and repaint
them. This, of course, involves removing the wheels and then popping
them out first. Not a big deal.
Well, I found some touch up paint that matches the color exactly.
Dupli-Color is the brand. I got it at AutoZone for like three bucks -- a whole lot cheaper than
replacing the caps!!!!!!!
A list of places that do polishing or other metal finishing:
_______________
Date: Sat, 17 Mar 2001 11:06:23 EST I paid $369 for my UIM, TB, Water Thermo Housing, a pipe for my APEXi turbo
kit (polished) and 40 misc nuts and bolts (chromed) including strut tower bar
bolts. The turn around time was a bout 3 weeks and it's a TOP NOTCH job.
I've been going to them ever since Firas Arabo reffered me and I wouldn't go
anywhere else.
They're located in Michigan, but FWIW here's there info:
They also do nickel, copper and gold plating along with custom metal work.
Date: [Mail me]
[To Lightning home]
[To my home page][Copyright Notice]
Aluminum Polishing
From: Rob Robinette (robinett@postoffice.dca.net)
How To Polish Your Manifold (and other aluminum)
What You Need
Sanding
Polishing
Date: April 1, 2000
> I polished a couple of the intake IC pipes this weekend.  Turned out
> unbelievably well.  I would higly recommend the Eastwood kits/supplies.  I will
> have photos up soon.  I even ground off the welds and sanded down first, so the
> pipes have no seams.  They vanished completely.  Very cool!
>
> Question:  I am going to do the IC itself too - that should be much easier than
> the pipes.  If I do, would grinding off the welds weaken it too much?  I don't
> think it is such an issue on the pipes, but I would hate to weaken the seam on
> the IC and have it split.
>
> I am having suspension probs, very load groaning and gronking from the front.
> If it turns out to be lower balljoints as I suspect, that would require the
> whole lower A-arm to be replaced.  Guess I would have to polish those too.
Date: April 19, 2000
>soon i will be installing a crane hi-6 on my car and will have the throttle
>body off.  i figure that this will probably be a good time to polish it.  i
>have read the how-tos on polishing but was wondering if it was any different
>to polish the throttle body since the metal was a different texture than the
>extension manifold or and other cast part for that matter
Date: November 13, 2000
Date: April 19, 2000
Date: April 20, 2000
From: RACRX93@aol.com
Wheel Refinishing
Date: Mon, 11 Nov 1996 14:23:18
From: Dale Clark
From: jpullen@netscape.com (John Pullen)
Import Touch up #77-01579 code 176 made for Platinum Silver Toyotas (M)
Clearcoat for 1989-1994 vehicles.
The UPC is #26916-71579.
Polishing Companies
Denver, CO 80210
317.546.9004
3901 E. 26th St.
Indianapolis, IN 46218
From: WreckognizeDIS@aol.com
ABC Custom Chrome, Inc.
Phone - (248)674-4333
Fax   - (248)674-1566
Jim Brown