

PFS makes replacement front fascias that IMHO aren't the best looking, but look to be pretty functional if you are looking to get extra space to relocate the intercooler or radiator.
Mazda Competition Parts makes complete kits for road racing. Probably very expensive, and aren't good looking at all. Probably mostly functional. They also show a front clip kit that is kind of interesting.
Veilside makes kits that add all sorts of aero flares and such. Some of the lines look good, some don't. Makes the car a bit "busy".
Knightsport also makes complete kits. Someone has a picture on their Web site; I will post when I find it.
Erebuni makes complete kits.
____________
Date: Mon, 22 Sep 1997 20:17:35 -0500
From: "David Ieroncig" (Rx7@Rocketship.com)
You may or may not be a partisan of the "aerodynamic laundry" type of bodykits for the 3rd gen, but this MazdaSpeed kit is worth a good look.
Enjoy.
_______________
Date: Mon, 25 Aug 1997 21:27:36 -0700
From: Daniel Huang (dhuang@home.com)
Erebuni doesn't make their own kits. Everything they sell are fake imitations of the RE Amemiya, Veilside, Peter Farrell, etc... They would look identical but the quality of the Erebuni may not be as good. I know for a fact that the REAL Veilsides use Polyurethane while the fake use fiberglass. Polyurethane is quite a bit more durable than fiberglass.
____________ Trev's site has a picture of the Erebuni front end.
_____________
Date: Tue, 26 Aug 1997 07:58:59 -0400 (EDT) I've been researching body kits for a couple of months now. John (works
for PFS) told me that they were buying theirs from Erebuni. They had to
stop selling them because nearly 50% would not fit the car after they came
in. I was told yesterday that fitament is the biggest issue with the kits.
Apparently what happens is that someone makes a copy of one that fits well,
but then copies are made of that and more copies of the copy are made. It
doesn't take too long to get it out of shape so bad that it becomes a
problem to install.
____________
Elite Motorsports
has pictures of a few of these kits on their Web site.
_____________
Date: Wed, 07 Jan 1998 17:21:14 -0500 The reason that the body kits vary so much in price is that the knock off
kits are produced by so many different vendors. The knock kit for the
Veil Side Combat Style kit is produced by as many as 3 different
companies and sold as a Veil Side style kit, or even worse, the 'real' Veil
Side kit. It is definitely a buyer's beware market when it comes to body
kits. Most vendors will inform you of who really makes their kit, if you as
them.
The 'real' kits (Veil Side, RE Amemiya, Knight Sports) cost so much
because of their rarity in the US, shipping cost from Japan and possibly
the dollar/yen relationship. There are probably many more reasons but I
just included the obvious.
One thing of note: The knock off kits are usually NOT made of the same
material or quality as the Japanese kits. For an example of this, call Peter
Farrell's shop. The kit he sells is made by Erebuni and is a knock off of a
Knight Sports kit. Anyway, to make a long story short, he sent more than
half the wings back because they didn't fit. Of the remaining half, most
had slight fitting problems.
_______________
Date: Sun, 15 Mar 1998 21:52:49 +0000 The head tech at Knight Sports said that a lot of American cumstomers
seem to be interested in the body kits. I don't know why anyone would
want to mess with the most beautiful car [3] ever mass produced, but I
guess it's just a matter of taste. Anyways, there was a thread about
people having trouble with copies of body kits a while back. The KS
head tech mentioned that even the original body kits are not a perfect
fit since there are always variations from car to car even from the
factory. When a copy is made it just makes the tolerances even worse.
Keep this in mind when ordering aftermarket body parts.
________________
From: Steve Cirian (steve@ScuderiaCiriani.com) That is the new '99 nose. The RX-7 is still made Japan'only, and it got a new nose for '99.
There are several shops that sell these, like rx7.com, corksport.com, and maybe
Pettit or PFS.
When you call them, ask if they are selling the original one or a fiberglass replica. The
fiberglass replica will be cheaper, but it is more susceptible to damage if you hit anything.
Also, the '99 piece comes with the front license plate holder molded into it. If you want
that, cool. If you don't like the look of it then you will need to have a body shop remove it
and cover the resulting hole - semi-major work. I think one of the places that does a
fiberglass replica makes it w/o the holder and so avoids the issue.
One of the shops that sells the urethane factory piece will do the plate holder work
before they ship it to you.
You may have to order additional pieces when you get it, like the reinforcement piece
behind the skin, the front spoiler (different than the 93 - 95 ones), the oil cooler ducts,
possibly radiator ducting if different, and the driving lights if those are what you want.
Ask the places that sell these what comes with it and what are optional and/or mandatory
pieces.
See Wael El-Dasher's site for more info. He got
one and could probably give you more insight into parts required, how much work, and
cost.
________________
Date: Mon, 20 Dec 1999 00:05:44 -0500 I suggest you get the 99 front end and rear spoiler (or any rear spoiler you
like). Stay away from fiberglass front ends (nomex on) they are a complete
waste of money and will never last/age as well as polyurethane (sp) bumpers.
You will have to deal with the scraping, patching re-painting...I am sure
the fiberglass will fit just as well as OEM, but it's their lack of
flexibilty makes them vunerable to damage. So while they might be cheaper to
buy, they are more expensive in the long run.
I heard horror stories about Erebuni (ie junk Nopi knock-offs from Japanese
tuners) so stay away from them. The only aftermarket Urethane bumpers are
made by STILLEN, but I do not think he makes any for rx-7's, too bad really
since he is the only one equiped to make high quality bumpers.
I suggest you contact the usual suspects, M2 Performance, RP-Online and Cork
Sport and price the 99 bumper, it is cheaper ($50-$150 depending on who you
call) than the 93-96 OEM, but the reinforcement is still the same price as
the US spec unit (the US spec is 2 pieces, the 99 is one piece) which you
will need. You could be cheap about it and have the bodyshop fill in the
extension on your old reinforcement, but I think it might end up costing the
same in labor.
Some things to ask when looked for CF hoods:
--Steve
_______________
Date: Sat, 1 Jul 2000 08:57:57 +1200 None of the aftermarket fronts or hoods fit perfectly, they all need a
little work.
MazdaSpeed is probably the closest.
We've fitted:
Some of the Hong Kong copies fit better.
Some of the Japanese ones are made in Hong Kong!!!
_________________
Date: Thu, 14 May 1998 13:43:52 -0700 The maker of the carbon fiber vented hood used on Adam's car
is named Art Dumont. His phone is 310-316-4050. No guarantee
here cuz I bought the hood from him in '96. The price I paid was
$745 including shipping from CA to UT. The price he gave me was
very low so try to match the price if you can.
_________________
I have a carbon fibre hood that I bought in '96 and it looks exactly
the same as RP and Pettit hoods from the pictures.
The maker of my hood is Art Dumont. His phone is 310-316-4050
and again no guarantee here 'cause this is the phone number I got
2 years ago.
>2. Pettit catalog says "some minor fitting required". What's that mean?
If you had a strut tower bar, you have to cut the column to fit the
bar in, no big deal here. On mine, I have to have the bodyshop
cut the vent hole for me. It came with no hole and I do see some
others that they didn't cut the hole and I do not know why they need
this hood. In the latch lock area, you have to cut it wider 'cause it
doesn't match perfectly, but still no big deal here.
>3. What's the fit & finish like? After painting can you tell (except Find a good bodyshop to sand the hood carefully and throughly.
The shop I went did a fantastic job for me. It looks great after
painting. It does look like aftermaket one, the hole is so big that
I cannot ignore it and nobody will think it is a stock hood. It does
fit great though.
>4. Has anyone been able to measure the effectiveness of the vent?
In the traffic, I can see the heat comes out from the vent and I
assume it's effective in this way.
>5. Do you mount the stock insulation to these hoods or run them bare? No insulation on my hood. Well, it seems it's not easy to put insulation
on unless you wanna drill some holes on the hood. Noise is just fine,
I can hear my HKS BOV clearly now. Not any vibration I've noticed.
>6. Pettit picture shows no washer nozzles. Are these holes not
>included? Any problem w/adding them?
No holes for washer nozzles. My car is an autox car, so I don't
really need them. However, the bodyshop guy told me he could
install that for me so it should be no problem.
The price I paid was $745 including shipping from CA to Utah.
Compared with the price from Pettit and RP, it seems I had a
great deal. Art did give me a big break, so try to match the
price I paid as close as you can.
The hood is so light, therefore when you open the hood don't just
leave it there otherwise the wind will blow it. It's better to find a
rope to tight it.
_________________
Date: Thu, 21 May 1998 17:09:49 -0700 >Did your hood require hood pins, or use the stock latching mechanism?
Not necessary to use hood pins, I am using the stock latching mechanism.
>Does it use the stock rod to hold it up?
Same here, I am using the stock rod to hold it up, but there's
no hole for the rod therefore I put the rod in that latch area.
The thing is because the hole isn't made for the rod,
once the wind blows the hood will come up. A motorcycle
cargo rope will solve this problem, put one end on the
rod and the other end on the latch lock on the hood will hold
the hood firmly.
________________
Date: Thu, 02 Oct 1997 14:53:24 -0400 G^Sport wrote:
Glen, The hood is avalable from Pettit Racing in Ft.Lauderdale
(954)735-0100 It's carbonfibre has the "venting scoop" in it and weighs
just 15lbs and looks damm good too!
_________________
Date: Fri, 31 Jul 1998 08:12:16 -0400 >For $1600 I would expect no less than perfect fitment!
Yes, I did too and I was somewhat disappointed in that area. However, my
body shop indicated that they could fix the fitment problems, paint it AND
my front mask, headlight covers, and blend into the fenders, for only $390.
The fitment problems apply to both gaps and level compared to fenders. For
some reason I can't figure, Mazda didn't design the hinge system and hood
latch to permit vertical adjustment. However, I believe (and the body shop
confirmed) that after painting the height discrepancies will be much less
noticeable. They will fix some of the gaps by grinding down the edges a
bit, and possibly by smacking the stock hinges with a big hammer to move the
whole thing to the left a bit.
Why the Mazdaspeed hood, even with fitment flaws, instead of another hood
with a hole in it?
1. It's the lightest thing going. 14 lbs without insulation and paint.
However stock hood is 20 lbs with insulation and paint, so this is a minor
benefit.
2. It's got the best looking IC extraction vent of anything out there.
3. It's carbon fibre bracing bonded to a pre-preg (pre-impregnated
fiberglass) exterior which is cured in an autoclave. This bodes well for
withstanding the engine compartment heat as well as
hot-shutdown-and-park-in-the-sun-when-painted-a-dark-color.
_______________
Date: Thu, 25 Jan 2001 00:34:04 -0800 I would check out the Faspac racing hood that
http://www.rx7store.net
sells. It is $550, madeout of Carbon Fiber, weighs ~15 pounds, and also
looks like the mazdaspeed hood.
_________________
I checked this one out on their web site, and the fit and finish were sort of shabby, but that was on a prototype one.
The finish is supposed to be better on the production ones, but the fit might not be. I would ask that question
before buying. But other than that, it looks like a nice design, and the price is really good too. --Steve
_________________
Date: Wed, 24 Jan 2001 11:29:22 -0500 Well, I received my new Karbonlite carbon fiber hood from Faspac Racing
yesterday and here are my thoughts/opinions if anybody else is interested.
Plusses:
This thing is beautiful, save for a couple of spots where some obvious
buffing was done. Whether you opt for the carbon-fiber look, or if you get
it painted, it will need some finish work. It comes gel-coated, so it's
half-way there. It's predrilled (accurately) for the washer fluid spra
nozzles. The latch is steel welded to brackets and then bolted on. There
are white lines around the brackets, so it was obviously test fitted. The
shape is right on with the stock hood and it comparatively lighter in
weight. The threaded inserts for the hinges seem to be nice and secure.
The unit is definately rigid... probably MORE rigid than the stock unit.
The vents are nicely placed and don't look like they'll interfere with a
shock tower brace.
Minuses:
The underside frame is not carbon fiber (but it's rigid). Some of the
seams are not fully sealed... looks like it could use some epoxy. The mesh
screening has come lose (probably during shipping) which could probably be
fixed with some more epoxy. I ordered hood pins with it but they didn't
ship them (not sure why.. they didn't charge me either).
Overall rating:
I'll give it an A- for now. I'm a little skeptical about how it will stand
up to the heat since the top and underside are dissimilar materials. I
suspect some separation will occur, especially if you race (like I do).
Definately worth the price ($452 + shipping).
___________________
Date: Thu, 25 Jan 2001 08:04:47 -0500 I don't think the rain will be an issue for a couple of reasons, at least
for me anyway: 1) I don't drive the car in the rain unless I'm prepaid for
a track driving school and it rains, 2) it looks like the rain will simply
fall on the intercooler, which if anything, is a GOOD thing :-)
Somebody else was concerned about the cooling effect since this hood
doesn't have raised perimeters around the vent. I think it doesn't matter
if it sucks hot air out or forces ambient air in (like cowl induction)...
either way, it's better.
I talked to one of the guys at Faspac about my concerns and he informed
that the frame part of the underside IS INDEED carbon fiber, not fiberglass
like I had speculated. It's gel-coated black instead of clear like the
top. So that erases my theory about the expoxy not holding the dissimlar
materials. They also agreed to send me some epoxy (free of charge) so that
I could resecure the mesh at the vents. They didn't ship the hood pins
becasue they simply weren't in stock.
_________________
Date: Mon, 26 Mar 2001 22:45:18 -0500 I am finally a satisfied customer. After getting the original hood that was
posted all over the internet, I was dissatisfied with fit and finish. There
were huge gaps all around the hood and it seemed too short. I talked with
Tom and he confirmed my suspicion about CF shrinking during its curing
stage. He promptly sent out a replacement hood free of charge and this time
it fit perfectly, even with my GAB shock tower brace. Finish is a little
better too. The only thing I had to do was drill the holes for the washer
nozzles and hood pins and shave 3/16 off the upper hood bump-stops (proper
term?). It's not painted yet and won't be in time for MADS, but I plan to
have it painted silver to match the rest of the car. I recommend this hood
to anyone who is thinking about buying one.
Incidentally, the hood weighs EXACTLY the same as the stock aluminum hood
with all the hardware installed, which is 20 lbs. I figured it would be
close since the stock unit is light. Mazda really did make an effort to
lighten things up and it's difficult to improve near perfection. Now if
only I can get my hands on a RENESIS :-)
_________________
Crooked Willow Composites is working on a new hood
design. It will be initially designed to work with their intercooler, and is targeted to be later modified to work with
other ICs. It also willl be available with a NACA duct going into the CWC intake. It should be really slick. --Steve
Date: Sat, 24 Apr 1999 22:20:33 -0700 This should probably go in an FAQ somewhere, since we seem
to keep answering this one about every 4-5 months...
RE Amemiya fabricated the car, and it's a scissor door lift, not a
"gull wing". The only gull wing doors I know of are on the Mercedes
Gull Wing (appropriately enough) and the DeLorean. Cost, I believe
was quoted at about $2,000 for the parts (it's not a kit, and it's not
available) and that work would have to be done by Amemiya at
their shop in Japan.
______________
Date: Sun, 25 Apr 1999 07:29:55 -0500 (CDT) Actually, I thought the cost was more in the line of $25,000. Seems that
not only is the hinge complex, there has to be a fair amount of body
work for mounting it, plus some for the latch.
________________
Date: Wed, 3 Jun 1998 09:36:53 -0400 This is probably old news, but if you are weight saving freak, check
this out.
I can put together a group purchase. I need just 10 people to send me
$5k each. :)
Date: Tue, 21 Mar 2000 21:18:57 -0500 After an incident where a couple of young hooligans decided to skip school
and throw stones from the top of a parking garage, at cars waiting at the
light below (they dinged my fenders, smashed my windsheild, and dinged my
roof), I went to the dealer and was told (at the time) a new OEM windshield
would run $650 not including installation, which is high but that was fine
with me, however the catch was it had to come ground as they do not
overnight windshields, which means a wait of atleast 1 week, plus wait for
the bodyshop to fit me in.
The dealer also informed me that all their windsheilds are replaced my a
local shop and adviced I go to them and save myself some money too. So I did
just that. They kept my car for 2 days as there is a curing period (I didn't
enjoy driving while watching the crack expand with every bump). They got me
PPG windhshield (Pittsburgh Plate Glass) which cost me about $350 installed
with new seals...etc. They were nice enough to transfer me registration
sticker too.
I looked at both windshields I am have no doubt that the PPG is very high
quality, but I suspect it is heavier because the OEM windshield uses thinner
glass. Its not a major concern though as I welcome a stronger windshield in
my case.
______________
Date: Tue, 21 Mar 2000 23:27:59 -0500 I agree with Wael El-Dasher's comments.
I have had the windshield on my car replaced twice. The first first time
that I had to replace the windshield(got a chip from a stone thrown up by
semi), I also asked for an OEM windshield. I was told that it would cost
more than $600 for just the windshield(labor would be additional) and it
would take up to a week to get it.
I ended up having it replaced with a "generic" windshield brand(I don't
recall the name).
The shop that replaced it does glass and windshield replacements only.
However they did a poor job. Although not visible from inside the car,
they cut the A-pillar plastic in two places and they used generic(cheap)
rubber molding around the winshield. The molding eventually shrank two to
three years later exposing the metal frame in the the upper corners.
This led to the second windshield replacement. I went to a reputable body
shop and they recommended a glass shop that they use. I also bought OEM
winshield molding from a Mazda dealer. The glass shop did an excellent job
and they used PPG. I am very happy with the glass and the quality of the
work they did.
In conclusion, I recommend the following.:
This shade was a Mazda / dealer option that attached to the top of the rear window.
From: Don M. (artdrectr@citycom.com) I recently researched car covers and talked to owners of several
different kinds. I purchased the best I could find: a Noah custom
cover. Bought from autosupermart.com (they have them made by Cover
Craft, but the price is much less). Part number C13505NH fits like a
glove on my 3rd gen which has a rear wing and R1 front lip. Total cost
including lock, storage bag and shipping was $147.00.
It takes about a month to arrive, since the covers are custom made to order.
The Noah is perfect for those times you need to leave your car out in
any moderate weather. I live near San Francisco and get lot's of sun and
rain, car is now always clean and dry. (Car should ofcourse be clean
before throwing on the cover). Any moisture evaporates under the
breathable fabric.
It will...just barely...roll up and fit in my trunk under the rear hatch
with the Bose Hose.
______________
Car covers (from the Miata list).
Date: Tue, 1 Feb 2000 09:09:41 -0800 I just had a key made for my 93, the dealer punched in the VIN and out came
a key code... Then they punched out a key.
______________
From: Blake [SMTP:bobrien@unb.ca] After a few weeks of searching, it looks as
though I have to go to a locksmith to get a new key made. Mazda Canada
doesnot have my key code on file so I will have to have the locksmith (local
dealership gave me their usual locksmith) take the lock cylinder out of
the passenger door handle which 'should' have the key code on it, and make a
key from that.
If not, they will have to make one from the actual cylinder
which will take longer and cost even more. This process is going to cost
me over $100, even if the key code is there, more if it isn't.
Efini is the name by which Mazda is known in Japan. A few people have
replaced the US Mazda badges with the Efini ones. Others have just
removed the US badges and filled the holes.
_____________
Date: Thu, 25 Sep 1997 13:09:22 -0400 (EDT) Peter at EliteMotorsports has the badges your looking for. You can
contact him at elitemotorsports@juno.com.
The No Pistons stickers are available again.
Date: Tue, 3 Apr 2001 14:39:22 -0400 (stock seat info):
_________________
Date: Fri, 10 Oct 1997 16:15:04 -0400 Nathan's is a Sparco 839 America. (I think that is correct) I
agree with Sandy. That seat is exceedingly comfy and is a great
alternative for those that need a bit more head room.
Jim O'Brien has the same seat (in black) in his car.
______________
Date: Wed, 20 May 1998 00:43:01 -0400 Yes, (my Sparco) did give me much more room. About 1 to 2 inches, which is actually
a tremendous increase. I made my own seat brackets, to get the seat as low
to the floor as possible. Everyone that has seen it has commented on how
nice it looks, so you can make something that looks good and also works,
without paying a fortune for the Sparco mounts, which I believe are higher
than mine as well. Here are some pics. I think it was well worth it, and
also gives the car a personal feeling when you are in it. Be careful when
mounting though, because you will need to lean the seat slightly towards
the center of the car to clear the shoulder 'wings'. It actually makes it
more comfortable to me, and to others that I have spoken with.
_________________
The Sparco Evo2 is the roomier model for those of us
w/ wide capitalist American behinds. I am probably going to get
this one. I think the Sparco America is wider as well. --Steve
______________
Date: Tue, 19 May 1998 13:36:16 -0400 I've put race seat in three third gen's so far:
My car - Momo Nascar C/K. I'm 5'8" and gained headroom.
Friend 1 - Momo Nascar C/K. He's ~6'2" and headroom's the same, but I
biased his seat for leg room, which (for the first time) he has
plenty of.
Friend 2 - OMP ??? Also ~6'2". This was a wide seat, and he gained a
little headroom.
For the Momo's, I used 1/4" x 3" aluminum angle as adapters from the
race seat to the stock rails. For the OMP, I had to use 1/8 steel, bent into
a "U" channel for strength, as I had to keep every last bit of headroom for
this guy.
If you've got an aluminum seat, it may be possible to make new mounting
holes in it to match the stock rails directly, but if you've got a
composite seat
I'd recommend using it's original mounting points. If you're desperate for
room, you may have to hard mount, or find really low profile sliders
(Porsche?).
______________
Date: Sun, 17 Sep 2000 06:13:22 -0700 Thanks for all those that told me about there experience with Sparco
seats....Should have know I would need custom brackets :)
Anyways for the Max Cooper in all of us( I think he's the one that likes
to weigh stuff)... I weighed the stock leather seats and they weighed
~30 lbs each (bathroom scale) and the brackets weighed 10 lbs each.
My Sparco Supersports weighed in @ 24 lbs each(w/o brackets). Man these
seats are nice. Kinda on the narrow side for my stocky build. (5'8" /
185) but they are very comfy.
I tell you they barely fit width wise in a
FD also...The huge side bolster comes very close to the door sides.I
have not measured increased headroom just yet, but because I need to
raise the seats up from the base a little to make room width wise...I
may gain about 1 inch in headroom.
They are very well made...I got that
alcat (something) with suede leather....I always longed for the seat
stick I had in my old R1 ( I knew I should have keep the seats.)
and was never satisfied with the sliding tendency of the leather. So now
I got that feeling back again !
______________
Date: Sun, 24 Sep 2000 13:03:06 -0400 I have a pair of Sparco Rev Kevlars in my FD. I'm 5'10", 200 lbs, 46 chest, 36
waist. I fit fine widthwise. Heightwise, I have them mounted just a
little lower than stock, and I fit fine. I'm not sure someone 6'2" would
be comfortable with my setup, but it should be possible to mount them
lower - I just didn't need it. The outside wing of the seat indents the
plastic door panel a little bit. This can be addressed, if desired, by
taking off the cover and cutting down the wing.
I'm very happy with my setup.
_________________
Date: Mon, 7 Feb 2000 11:34:05 EST I replaced the seats in my "other" Mazda with a set of Corbeau GT9CS's which
are quite nice (and quite expensive). Like the RX7, I simply unbolted the
whole stock assembly and replaced it with their seat rails. I gained maybe
3" of head clearance (good as I'm 6'3"). I'd imagine it'd be similar for the
RX7. At 19lbs and FIA approved, the seats are quite nice. Non-reclining,
but the seat rails do give fore/aft adjustment on them. Fully bolstered so
you're stuck in them like glue. The wife hates em'. Too hard to get out of,
LOL. But I highly recommend Corbeau's. They have a few less expensive
models now availible. You can glance at them if you'd like at
http://www.probesport.com/superprobe in the interior section. Corbeau's
web page is http://www.corbeau.com.
________________
Date: Tue, 3 Apr 2001 12:10:50 -0700 I have a Corbeau Forza II seat bolted to the floor with brackets (no rails)
and it gave me about 3 more inches. I'm 6'1 and could not fit in with a
helmet at all, now I can with a tad to spare. I don't see how you could gain
much more than about 3 inches.
________________
Date: Tue, 3 Apr 2001 20:20:10 -0400 I raised the steering wheel on my car - about 3/8" at the bracket which is
about 3/4" at the steering wheel. This involves taking the dash out and
doing something like rewelding the steering wheel mounts on the cross tube.
We did it with the welded in roll cage installation. But the cage was not
required - just the expert welding.
I had thought of removing the breakaway steering mounts to get the height.
Also I thought of making custom seat rails for about 1/2" clearance.
And two or three years ago someone posted about taking 1" of seat padding
out for clearance.
Take careful measurements of the racing seat. Not all of them give more
thigh clearance.
________________
Drew writes about installing 3rd gen seats in a 2nd gen:
Date: Thu, 27 Jan 2000 09:57:55 -0600 FD Seats are actually smaller than FC seats.
Brackets need to be made to mount the seats to the FC rails.
I'm not really all that happy with the fitment of the seats because they sit
a bit taller than the FC seats, so it pays to have an aftermarket steering
wheel.
Also the passenger side seat sits crooked unless you use some spacers to
even out the seat.
Andrew of Jimmys Mazda RX7 Specialists
in the UK was kind enough to send me this photo of the rear seats (not available in the US):
________________
Date: Mon, 18 Sep 2000 15:26:46 -0700 While I was out I also installed some factory rear seats into my 93 R1, I
got them from England.
I thought I'd give everyone a list of what is needed in case you buy a set
(off thepartstrader.com) or something. The set I bought are black vinyl, if
anyone wants to trade for some that would match the R1 seat material let me
know!
The seat belts bolted right in, the carpet in the passenger compartment has
a few spots that now show the body underneath. I am going to make some
little pieces of material up and velcro them to the stock carpet and it
should match pretty well.
Date: Sun, 9 Nov 1997 22:11:34 -0500 I just finished installing a Sparco "Ring" steering wheel on my 3rd gen.
It looks and feels great. I now have more thigh room and the Ring has a
flat bottom (cool). Here are some tips.
The stock wheel is about 14.5 inches in diameter (wheels are measured
outside edge to outside edge). The Sparco Ring is 12.8 inches in diameter,
it cost $145 with shipping from Autocraze (on the web).
Sparco steering wheel's are compatible with Momo hubs and spacers.
Using a Momo hub ($55) for a 2nd gen and one Momo spacer ($19) brings
the wheel out to the stock location. The Momo spacers are stackable
but you need longer screws if you use more than one spacer (the spacer
comes with screws that work with one spacer). I used two spacers and
5 x 65mm regular pitch screws from Maryland Metric (they have a web page).
The main wheel nut is 21mm. It was easy to remove with a 1/2 inch breaker
bar. The wheel came off by lightly bumping the back of the wheel with my
hands. You have to be careful here to keep from collapsing the steering
column.
Racing steering wheels like the Ring usually don't come with a horn
button or even a cover for the center hole. I used black plastic from
a flexible, black plastic 3 ring binder and cut out a round piece to
place between the wheel and the first spacer to cover the hole. Looks
great.
I added two small, red, square, momentary push buttons (from Radio
Shack) for horn buttons. I put them at the 3 and 9 o'clock position
for thumb access. They look like the control buttons so popular in
CART and F1 (very cool).
I'm going to hook up the horn by using a spring connector to make
contact with the metal ring on the bottom of the hub. This is a real
pain in the butt. I plan to find the horn wire by probing the now
disconnected steering wheel electrical connectors with a grounded
wire, when the horn goes off I know that's the one.
It took two tries to get the wheel centered for straight line
driving.
I was able to remove the air bag warning light bulb by using a
long screwdriver. The bulb only has to turn about 1/8 of a
counterclockwise turn. From below the dash, I pushed the right
side of the bulb base with the screwdriver and it turned and fell
out. This was much easier than removing the dash.
The new wheel blocks the top 1/3 of the tach.
A wheel change is a lot of work but I think it was worth it.
The wheel is closer and I don't have to worry about that damn
shotgun shell pointing at my face.
_________________
Date: Sun, 30 Nov 1997 10:26:14 -0500 ...Not only do I lose the airbag... I get a shabby horn arrangement... AND
I have to dream up some way of installing the cruise control buttons
that are attached to the stock wheel.
The question is; Why is the wheel swap worth it??
I wanted more thigh room (I'm 6' 2" 220). I wanted to bring the wheel a
little closer so I could move the seat a little more aft. I wanted a
smaller diameter wheel for quicker steering feel (it is quicker and the
power steering feels about right now). I wanted to get rid of the air bag
(maybe I'm just paranoid but I don't like that thing pointing at my face),
and I liked the way the Sparco, "Ring" steering wheel looks.
Connecting the cruise control buttons on the steering wheel will be next
to impossible. Auto manufacturers got away from the old style horn
connector because they had to make multiple electrical connections with the
air bag, horn, cruise control, and radio control stuff. A sliding connector
won't work for this so they went with the "clock ring" wound wire device
that's on the last gen and most other modern cars.
The horn button can be worked because the Momo hub has a metal ring
built into it for a spring plunger horn contact but you will have to
come up with the plunger (or spring metal to make contact with the
horn ring) yourself.
_________________
Date: Wed, 11 Mar 1998 20:24:37 -0000 For anyone wanting to remove the standard wheel due to fitment of an
aftermarket wheel, Mazdaspeed has a boss fitting on their website that you
may find useful, as it eliminates the warning light.
_________________
Date: Wed, 12 May 1999 08:46:41 -0700 I was wondering if anyone out there with a Momo Steering Wheel has either
looked into or own a MazdaSpeed hub adapter? It is supposed to alleviate
the airbag light blinking (without just yanking out the bulb) and perhaps
reactivate the horn. I got a price from CorkSport for $140. Seems high for
a hub (Momo charges $30-$50?) but normal for anything from MazdaSpeed.
_________________
Date: Wed, 12 May 1999 11:39:47 -0500 Got one, horn and airbag fooler works perfectly, looks factory, track
tested. Get one.
_________________
Date: Sun, 14 Feb 1999 22:30:27 -0500 (EST) I was just checking the Mazdaspeed web site and noticed they now offer a
steering wheel adapter for installing a MOMO or similar steering wheel
on a 3rd gen. It includes a connector or something that turns off the
flashing air bag light (and I believe stops the series of 5 beeps). The
air bag light flashes and a series of 5 beeps occurs when the air bag is
disconnected for those that didn't know.You can get around this by
removing the light and disconnecting the diagnostic module under the
dash but its a pain if you ever have to reconnect them.
Wonder if it allows the horn to work? I added a MOMO Tornado wheel but
still haven't figured out how to get the d@mn horn to work. I've gotten
the cruise to work but still no horn. Anyone have a gizmo to get the
horn to work. I know some list members have fabbed something to get
around this.
_________________
Date: Sun, 14 Feb 1999 22:02:56 -0600 The MazdaSpeed adaptor has a horn hookup.
_________________
Date: Sat, 16 Sep 2000 10:24:45 -0400 hi. smartracing.com (or, smart-racing.com) sells one for
about $275 that's very nice. It's a true racing part. I've
heard from Victor Masch that its very nice, though he said
there was some issue with it extending the wheel into the
cockpit about an inch. I have smartracing's
extender/spacer that moves the wheel about an inch and a
half further out, so I don't ever hit the turn signals or
wipe switch. My piece is beautifully made. -gordon
_______________
I (Steve Cirian) sent an email to Corksport
asking for info on the MazdaSpeed steering wheel, since I want one wityh no D-shape
and no thumb indents - just a nice smooth wheel. Here is their response:
The smallest wheel is 340mm that Mazdaspeed sells. It is the D-cut wheel.
The others are all 360mm.
________________
Date: Wed, 31 Jan 2001 17:07:28 -0500 If I remember right, the stock wheel is 365 mm.
I have used as small as a 300 mm Momo wheel, while I still had power steering.
That wheel would be almost
impossible to turn without power steering.
Further, all of the wheels smaller
than 350 mm really block the view of the tach and speedo (not that we need to
see the speedo...).
I currently have a 330 mm wheel with an inch and a half hub
spacer. That way i can see the gauges and there's less chance you'll
inadvertently hit the turn signals or wiper stalks whn driving hard. ( i forget
the name of the company that sells the adapters, but they advertise in
grassroots motorsports.) i think 320-330 mm is a pretty good size. the momo
"compoetition" is a pretty good compromise. -gordon
________________
Date: Mon, 30 Jul 2001 22:21:52 -0700 Not sure how that may fit over our spline. I think they're more for karts
or Formula cars.
A kinda ricey option may be these guys. Seems to have electrical contacts
for horns too. http://www.tekniqauto.com/
Smart Racing's been around for a while with their QR system. A bit pricey,
tho I'm still interested.
http://www.smartracing.net/ProdCat/Driver%20Comforts/Driver%20Comforts.htm
________________
Date: Tue, 31 Jul 2001 03:04:40 -0400 (EDT) The shaft end had to be welded on, AFAIK. The hub is listed as being for
3/4" columns. I don't know if that is the size of our column, maybe
someone else here does. I would rather not take apart my steering column
until I have the parts I need.
Definitely not for just formula/kart type cars. For sure I know that the
Panoz GT-RA cars have them and I found that they made ingress/egress much
easier than it would have otherwise been.
Thanks for those links. The Smart Racing piece looks interesting. I'm
looking at something else, that most places sell for about $60 (baker
precision sells it for $40+).
http://www.bakerprecision.com/strghub.htm
Part# BRP 179 specifically. I'd like to find out a little more about this
other unit you listed though.
From: "David Ieroncig" Well these magazines are showing their true use... shopping.
FYI... particularly those who have already attained that 360 HP level
and did the $4000 wheel thing ....
The NOPI ad in Sport Compact Car lists a real carbon fiber dash kit for
FD's. That could be real sharp.
Has anyone seen these? Any good?
The ad doesn't have a price quoted, but does state that prices vary
from $150-$800.
____________________
Date: Tue, 24 Feb 1998 10:19:25 -1000 Well, I finally broke down and bought a real carbon fiber dash kit for my
'93. I've always hated the large expanses of cheesy, creaky painted plastic
inside the 3rd gen (every time someone sneered about how GM cars have too
much cheap plastic inside, I used to kind of flinch). The interior styling
is great, but I've always thought that Mazda did a better job in the 1/2
gens in minimizing the obviousness of the plastic. Also, we all know how the
damnable stuff peels on the '93s.
Anyway, I decided to go with the Torasport 11 piece kit. The real overlay stuff.
Got it Friday and installed it Saturday.
The kit pieces are visually very attractive; deep, clear 3D look with nice
rounded edges. Not too thick, not too thin.
Installation is, shall we say a rather nerve racking experience. One mistake,
and immediate suicide is the only relief.
I managed to install all 11 peices without removing any of the dash panels.
The only really tricky one was the instrument cluster. Not fun at all. This
one requires very clear planning and systematic work. If you feel up to it,
you might want to remove this panel before installing the overlay. But if
not, I am proof that the overlay can be installed without doing so.
In the end all of the pieces lined up amazingly well.
Overall impression? Very well designed kit. Everything lines up
exceptionally well if you get the installation right.
I only have 2 gripes about this kit.
One, the one piece overlay for the shifter/fog light panels does not cover
the entire area of both plastic panels. So, if you are trying to cover
scratches, make sure the kit will hide what you want.
Second, the overlay for the panel housing the climate controls, while
beautifully engineered, unaccountably fails to cover the lower portion of
the panel where it sweeps down toward and meets the shifter panel. Instead,
the overlay simply follows the outline of the radio/CD square. I do not like
this at all and am going to try to work out something with Torasport to
cover that area with a third piece.
All in all however, my dash/doors and center console now look AND FEEL
pretty bitchin' and I SWEAR that the car feels faster.
My wife likes it too, though she still complains that the car makes her have
to pee 'cause it rides so rough.
BTW, the kit was $418, incl shipping Fed Express. I dealt with someone named
Rose, and she was very sharp.
________________
Date: Thu, 14 May 1998 11:12:50 -1000 I was unable to find any kit which completly covered the shifter area.
ToraSport told me that they refused to do such a kit because it would
eventually separate due to the nature of some of the bends which would be
necessary. This may or may not be true.
All I know is that I wish there was such a kit and if anyone finds one let
me know as I would definately upgrade mine given the chance.
BTW, ToraSport is sending me gratis a newly designed piece for the plate
surrounding the radio square which supposedly includes extra coverage of the
area where the plastic sweeps down and meets up with the shifter plate.
We'll see how it looks. Other then these two old gripes, I remain very happy
with all other parts of the kit I bought, particularly how it dealt with the
plastic on the driver's side door.
__________________
Date: Wed, 16 Dec 1998 15:29:49 -1000 Just in case anyone cares, Torasport was nice enough to send me free of
charge their updated CF "sticker" for the plastic panel surrounding the
radio square. The new piece covers the area where that panel sweeps down and
connects with the shifter panel. This was my biggest (though not only) gripe
about the original kit and it's nice to have it taken care of.
Anyway, I can confirm that should you so choose, you can remove this stuff
without damaging the underlying paint on the plastic. With a hairdryer I was
able to peel the old overlay off with no ill effects. Nice to know.
___________________
Date: Fri, 2 Jun 2000 12:14:45 EDT Would anyone out there be interested in a brushed metal dash kit for their
RX-7? Go to
http://www.PerfectImageCreations.com
and see the quality. The guy that
owns this company is 1 order away from putting the kit together, and would
probably ba all for a group buy if enough interest is generated... let me
know PRIVATLY if you are interested.
From: koshkas@organizedwedding.com (Jim Kim) Recently I purchased one of David Breslau's
pedal sets to use on my FD. This is my review.
[Note: I haven't been keeping up with the List
for the last few months, so if there have been
a flood of posts on this subject, I've missed
'em and you're reading another one. Also, if
you have questions or want to flame me, then
please do so directly so that I can respond.]
What is it? Basically, the pedal set extends
the width of the accelerator pedal by means of
a machined aluminum plate. The extended width
narrows the distance between the accelerator
and brake pedals so that it's easier to
perform heel & toe downshifts.
Why buy it? I've been trying to learn how to
heel & toe downshift, but it's been difficult,
partly because my foot would tend to slip off
the right side of the brake pedal as I tried
to work the brake and the accelerator. I
could have tried wider shoes (and lost
sensitivity), a new pedal set (couldn't
find something I really liked in the
"mass market" alternatives-- see below),
or wider feet (too hard to explain :).
David's set is nice because it does what I
want (narrow that gap) without requiring me
to take what I don't want.
Why not buy a different pedal set? I had
considered something like a Razo set, but
the full Razo set comes with covers for
the accelerator, brake, and clutch pedals.
That's more than I wanted, and although you
can purchase the covers separately, I
thought that it would look funny to only
mount a cover on the accelerator or brake
pedal. This would also change the relative
"planes" that the pedals are in (maybe this
isn't a big deal, but I didn't feel the urge
to experiment). Also, I was told that they
required the drilling of your existing
pedals for installation.
How does it work? The kit consists of two
main pieces: a machined aluminum plate that
extends the width of the gas pedal, and a
machined aluminum u-shaped block that clamps
the plate to the gas pedal and its mounting
rod. Screws hold the plate to the block so
that the block clamps around the back of the
accelerator pedal arm, and the plate is held
in tightly against the left side of the
accelerator pedal. The plate is drilled in
a pattern that is similar to the one on the
stock brake & clutch pedals, so it matches
up nicely. Note that the finish is not
identical to stock-- it's better since it
doesn't look like an unpolished casting.
How well is it made? Very well. The
finish is to a much higher standard than
any of the other metal pieces on the car.
The plate is light and only as thick as it
needs to be. The u-shaped mounting bracket
holds the plate to the accelerator pedal
without any drilling of stock pieces and
seems very solid. David may have posted
pix, or if you ask he can probably send
some pix to you.
How well does it fit? Fit of the small
pedal (the one I bought) is perfect. It
snugs up against the left side of the
accelerator pedal, and the top surface is
level with the stock pedal (even matching
the curve). David has a larger version as
well, but the small one is perfect for me.
OK, you've blathered on long enough-- how
well does it work for its intended purpose?
And, should I buy it? The pedal set works
great for me. I just won Daytona thanks to
this setup and now I'm going to Disneyland.
Oops, wrong dream-- well it has eliminated
my "foot slipping off" problem, and I've
been able to practice rev matching (or
attempts at it anyway) while downshifting
with no problems. The mounting has been rock
solid. Overall, I would say that it's made
the car a lot more fun to drive. I won't
know how it works at the track until Todd's
next event, but I need to practice before
then anyway. Regarding whether you should
buy it, that's completely up to you (see
disclaimer below)-- I am just letting you
know what I think of the product.
C'mon Jim, if you had the chance would you
buy it again? I have a set so there's
no need to buy it again-- unless I buy
another FD...
Summary: Disclaimer: The contents of this message
represent my personal views and opinions,
and in no way represent the views or
opinions of my employer or any other
person or entity. THIS MESSAGE DOES NOT
CONTAIN OR CONSTITUTE ANY WARRANTY OR
REPRESENTATION, WHETHER EXPRESS OR IMPLIED,
REGARDING THE SUBJECT MATTER DESCRIBED
ABOVE, INCLUDING ANY WARRANTIES OF
MERCHANTABILITY OR FITNESS FOR A
PARTICULAR PURPOSE. Other than as a
purchaser of the pedal set, I have no
relationship or affiliation with David.
_____________
Date: Thu, 10 Jun 1999 14:30:04 -0400 I think Mark O'Dell has written one of the best explanations for
heel and toe that I've seen. I hope he won't mind if I shamelessly add
that there is an adapter that makes heel and toe shifting the third gen
much easier for most people.
It's called the Widefoot, and it allows people who can't comfortably
span the distance from the brake pedal to the gas pedal to reliably make
proper heel and toe downshifts. There are two sizes, so that people with
different methods or shoe sizes can have a choice.
The small Widefoot fits in the upper left of the stock gas pedal,
flush to the surface, and matching the contour of the pedal. It widens
the pedal by almost two inches at the top, and is about four inches long,
tapering such that the left edge is straight.
The large Widefoot is a little narrower at the top, but is much
longer (the same length as the stock pedal), and widens the bottom by
almost 1.25 inches.
Both types are a two piece design, machined from 6061-T6
aluminum alloy. They mount very securely without drilling, by using a
rugged "C" shaped clamp that fits around the upper shank of the gas
pedal assembly.
Pictures (jpgs) of the two Widefoots are available, with the small
mounted in my car, and the two sizes together. The small is $55, the
large $65, shipping included.
Please let me know if you have any
questions about the Widefoot. Not everyone needs one, but those that
use it (many on the list) really like them.
Widefoots can be ordered from me or from:
_______________
Date: Tue, 31 Mar 1998 23:17:51 -0600 If your only issue is the distance between the gas and brake pedal, I'd
recommend the OMP pedal kit. The kit is three bolt on pedal "covers". Each
piece is sand cast aluminum, and looks much like the brake & clutch pedals
in our third gen cars. The gas pedal is fairly large and is useful for
making up the distance between it and the brake.
You simply remove the rubber covers from the brake and clutch pedals. Then
figure out where you want the aluminum pedal covers. Drill 2 holes in each
pedal and bolt the aluminum parts on. The fasteners have countersunk head
so they are flush with the pedal surface.
I just bought a set and put them on my 323 GTX (winter car) because, even
with my size 13 canoes, I didn't feel comfortable trying to heel and toe. I
use the one side of the foot on each pedal technique, and sometimes under
heavy braking my foot would slip off the brake...very bad. The car is 100%
more
fun to drive now that I can heel & toe at every corner. I picked up my set
at Pegasus Racing (close to you there at UWM) for $32. Another source is
at: Road Race
Engineering.
_____________
Date: Tue, 31 Mar 1998 18:30:48 -0500 I recently saw a set of so called "racing pedals" in Car Parts a NJ auto
parts chain. They are made of metal with rubber studs on them and are
slightly oversized. They come in several iodized colors, red, blue, gold,
silver. (I wanted black but they didn't have them) The pedals clamp right
over your existing pedals with a steel spring and clamp mechanism. They
appear to be pretty well made however a complete set costs only $20 so I'm
a little wary. From what I could see they seemed fine but I did not buy
them and test them out so I really can't tell you how good they are. If you
want email Ritchie at Car Parts, they can get just about any aftermarket
part at reasonable rates. I wa there today and they had an aftermarket 89
RX-7 nose someone ordered, it was around $400. Looked good to me! (I need
one) Their website is at http://www.carpartsinc.com
they are generally friendly folks and have been good to me for aftermarket
parts.
_______________
Date: Wed, 01 Apr 1998 11:36:02 -0800 Check out
Racing Dynamics.
I installed the pedals (I didn't buy the $134 dead pedal, just the $200
pedal set, heh) with the gas pedal rotated 180 degrees from the way it was
designed to be mounted. These things are intended for E36 BMW, originally
purchased for my late 97 M3e. They look great, IMO, are extremely light so
they won't inhibit your lighting quick pedal work, and pass all BMW snob tests.
www.bavauto.com if you want your own.
Installation was done by bending the pedals to fit the RX-7's using a rubber
mallet, drilling the pedals to fit the conveniently predrilled
clutch and brake pedal (I screwed up a little on the clutch pedal, so I had
to slot the holes on the new pedal...it's a little embarassing). Same for the
accelerator, although here I iteratively drilled holes in the new pedal and
the actual plastic pedal. Some stainless steel machine bolts and the forth
and it was done. Total about 2.5 hours.
On my way to work this morning, I actually did a heel and toe downshift from
3rd to 2nd while turning! The [3] accelerator pedal is so absurdly small and
funkily shaped to begin with that I can't believe I waited this long to do it!
NOPI also sells replacement kits for the stock gauge faces. These are
available in several different colors. White might be nice.
_____________
Date: Thu, 25 Sep 1997 09:47:44 -0700 Just found this site on the web. They make different color gauge faces for
lots of different makes including 3rd gens.
********** Wade Lanham's STEREO UPGRADE information.
______________
********** Date: Mon, 19 Jan 1998 13:16:18 -0600
From: Martin Crane > Does anyone know how to enable the stock Bose stereo 1. With the ignition switch in the ACC position, turn OFF the audio unit.
2. Press and hold the SCAN and AUTO-M buttons simultaneously until "code"
appears on the display (approx. 1.5 seconds).
3. Press SCAN and AUTO-M buttons again until four bars (-) appear.
Note: Input the code number within 10 seconds, or the display will be
deleted. If deleted, repeat from step 1.
4. While the bars are displayed, input the personally selected code number
by pressing the preset channel buttons 1, 2, 3, & 4. Use 1 for setting the
first digit, 2 for the second, etc. Press the preset button repeatedly
until the desired code number is displayed.
5. When the desired code number is displayed, press and hold the SCN and
AUTO-M buttons until a beep is heard (approx. 1.5 seconds). "Code" will be
displayed for approximately 5 seconds, and after it disappears, the number
is set.
Note: If "Err" (error) appears on the display, repeat from step 1. If the
input error is repeated 3 times, temporarily turn OFF the ignition switch,
and restart the proceedure.
__________________
Date: Mon, 19 Jan 1998 18:20:04 -0600 Go to
http://www.bhs.com/fca/mazda/tsbs.htm#TSB24
for info on getting the
dealer code to unlock the stereo. I got mine when the dealer screwed it up and
reset it in front of me. I had a good enough memory to write it down immediately
after. Hope whoever's site doesn't get flooded with questions.
__________________
Date: Sun, 04 Jun 2000 22:28:02 -0400 As I recall, I needed the bass and treble knobs and the dealer made me order
them directly from Clarion...
__________________
Date: Sun, 4 Jun 2000 20:32:09 -0700 __________________
Date: Tue, 1 Feb 2000 23:27:47 -0600 When I started looking for an aftermarket headunit for my RX-7, I wanted to
find something that fit the stock decor, but a lot of the stereos I found
stuck out like a sore thumb. I was looking for the following features:
When I started talking to people about the anti-skip protection using a
memory buffer, such as is found on the Sony Mobile ES headunits, several car
stereo shops told me that only headunits with inferior CD mechanisms used
anti-skip protection. They also said Sony uses the same CD mechanisms on
their home, computer, and mobile products to save money, but it resulted in
poorer performance in a car environment (who knows if this is true) and also
that headunits with anti-skip protection had degraded sound quality since
the music always played through the memory buffer (again, I doubt you would
be able to tell in a car environment, especially with all the road noise of
the RX-7). They said CD mechanisms have come a long way in the past couple
of years and a decent head unit would never skip.
I decided on the Kenwood Excelon KDC-X811. None of the local stereo shops I
talked to had it, so I bought it on the net for $400 from
http://www.lafayetteradio.com/, which was $150 less than list price. They
also threw in a wiring harness for free. After a month of operation, I have
NEVER had a single CD skip, and I have been over rough roads, tollway bumps,
etc., that traditionally made the stock CD player and a different
aftermarket CD player skip. Except for the anti-skip protection, it had all
the features I was looking for, plus the face folds down to load CDs, which
gives more room for the display, and it has:
The mounting depth came close to the maximum available in the RX-7, but it
did fit easily without any problems or modifications. I don't have any
amplifiers yet, but the sound is great. The internal amplifiers drive a set
of MB Quarts in the front doors and Alpine 6.5" speakers in the rear area
above the storage bins. I can hear the music fine even when cruising at
highway speeds. In the future I plan to add better rear speakers,
amplifiers, and a subwoofer.
There are two downsides that I have found. First, I started looking at the
regular line of Kenwood receivers (KDC-7011, KDC-8011, and KDC-9011), which
all use black plastic on the faceplate that perfectly matches the black
plastic in the '93 RX-7. I didn't realize that the Excelon line (KDC-X711
and KDC-X811) all use an "Ebony" faceplate, which is a glossy black (which
would really match
Wael El-Dasher's console
well, but I have to admit his McIntosh
components look and I'm sure sound better). However, the glossy black does
look really sharp, just not as stock as I was looking for and would have
gotten with the KDC-x011 line of CD receivers. I think you would be happy
with any of these headunits, but especially the KDC-9011 if you are going
for a stock look.
The second downside is that Kenwood did not design the MASK system with the
thought of the stereo being off but the faceplate remaining open. If you
turn the stereo off while the car is running (or accessory has power), the
faceplate reverses and hides itself, which is good if you are going to not
have the car (valet, service, etc.) but then you can't see the clock and it
is a little more of a pain to turn it back on using a hidden switch. I've
worked around this by keeping it on and just turning the volume down. Not
perfect, but I like everything else, so it is worth it to me.
If your budget is not so high, consider the KDC-7011, which you can get for
$200. You can get the KDC-9011 for $270, which has the spectrum analyzer
and florescent backlighting.
You can see pictures and specifications for all the
Kenwood CD Receivers
Then select Mobile Electronics -> CD Receivers -> Mid to High End ->
Category Overview.
Date: Sun, 05 Sep 1999 21:15:47 -0500 > Would anyone know of a place that sells aluminum race style gas cap covers ________________
Subject: Re: (rx7) [3] Eclipse Gas Filler Door Tom Walsh has graciously posted the pictures of this mod. Thank you Tom.
http://slim.achieversusa.com/gastank/
If anyone needs more info on how-to, just email me direct.
Date: Mon, 5 Jun 2000 11:01:51 -0400 I just stumbled on the following web site that sells automotive
carpeting. A 'complete' molded carpet set is only $190. Almost makes
steam cleaning a waste of time! Has anybody ever heard of these guys
before?
http://www.automotiveinteriors.com/Mazda.htm
_________________
From: Steve Cirian (steve@ScuderiaCiriani.com) No experience with them...
_________________
Date: Tue, 20 Mar 2001 10:17:56 EST Ok guys here's the results on my experience with VHT dye. I had tan
carpeting before and due to the color coordination of my interior (electric
blue/white) I needed to either purchase black or blue carpeting or dye my
carpet.
I was trying for find aftermarket molded carpeting for my 3rd Gen
but none of the places I called had the 3rd Gen carpet mold, hence no carpet.
Mazda wanted $1149 for the carpet, so that was a no go.
Finally my friend
who went to the SEMA show told me about VHT carpet/cynal dye and the demo
they had at the show and I decided to try it. I bought 6 cans of Black Satin
(prob. should of gotten Jet Black but oh well) and applied it on my tan
carpets. It came out very decent, the color was spread evently, it even had
a little shimmer to is (black SATIN). The carpet is a bit stiff right now
but not nearly as stiff as if I would have painted it and it seems to wear
off after some carpet wear. Overall I'm very satisfied with the VHT dye, it
works very good at $4.50 a can from Summit. I don't have any long-term
testimonials but I will keep the list notified when I do.
I also bought 2 cans of blue which I will be using to spray my carpet mats,
I'll let you guys know how blue comes out over tan carpet mats as soon as I
do them.
Date: Thu, 5 Feb 98 09:35:22 -0700 I just bought the Mazdatrix floormats for the 3rd gen RX-7 (my cat pissed
on the stock ones so I had to get rid of them... quick)... For 50 bucks
they are absolutely great. They fit MUCH better than the stock ones, but
there is no RX-7 logo. I HIGHLY recommend getting them as a replacement
set. They really were manufactured marvelously.
Date: Wed, 7 Jun 2000 13:40:59 -0700 Factory cargo nets in stock, something like $28 ea.
I haven't installed mine yet, but it comes with little "hooks" that screw
onto the studs for the Bose system.
_______________
Date: Wed, 7 Jun 2000 16:40:08 EDT I purchased the Mazda accessory cargo net. Looks nice. It is the usual
black stretchy net. There is velcro on the sides, to keep things from
sliding out from under the net. It attaches in the four corners of the back
with bungee loops of the net, to replacement T-hooks that screw down on the
threaded bolts, that come up from the bottom of the cargo area. The cost was
between $30 and $40, if I recall correctly.
If you stopped by my car at the Expo you would have seen it. You can take a
look at it in a pic my
daughter took at the Expo. The pic doesn't really show the
detail of the replacement T-hooks though.... sorry.
Marc is offering a custom made cupholder for the 3rd gen. --Steve
Date: Wed, 10 Nov 1999 22:39:43 -0600 The brackets fit in the emergency
brake well and the unit is completely removable-no permanent mounting. No
holes to drill, Velcro to paste, etc. Yet, it is very steady when put
in place. Fits cups from 2-1/4 to 3-1/4", made in Germany, same as the one
in the Mercedes 500SL. Very high quality, you won't find this at Wal Mart.
Folded cupholder without brackets measures 4-3/4"Lx4"Wx1-1/2H. With
brackets 4-3/4"Lx4"Wx2-7/8"H. You have to have it folded with a rider in
your passenger seat.
Send check/money order to:
Price is now $45.00 + $3.50 s/h(Priority mail)= total of
$48.50. The cupholder itself (w/o RX-7 bracket) can see it in the Griots Garage catalogue.
For my installation with the brackets, take a look at
The Interstitial Page
Note: Fits only third gen. 93-99 RX-7s.
Date: Tue, 27 May 1997 10:16:53 -0400 Let's first start off with the mass market Zymol. The stuff you find in the
mass market auto parts store.
It Sucks
Now for the boutique-type Zymol sold by Zymol and other authorized dealers.
Clear: 8.5oz $25 HD-Cleanse: 8.5oz $25
The Waxes:
Carbon, Creame, Japon: 8oz $45 Concours: 8oz $160 Destiny: 8oz $475 Atlantique: 8oz $880 Vintage: Lifetime Supply (They refill the container) $1500 Field Glaze: 16 oz $25 Vinyl: 8.5 oz $30 1/2 gal $80 That's all the Zymol I have experience with. I have a bottle of Seal for
the runner seals but I have yet to use it.
Coming soon. A review of Clay Magic. I used it over the weekend. Great
stuff.
___________________
Date: Fri, 27 Mar 1998 09:06:00 +0000 >I use Mequiar's professional series #7 and #9 and then Final I have been using Meguiar's products for years. It needn't be that
hard. I have three tips for you:
Before starting with any of this stuff, get some (believe it or not)
"Magic Clay." I don't know why it works, but it takes very little
time, and it will clean your finish so that it feels like a baby's
bottom. The benefit to this is that with a really smooth finish
before you start, you will find that the car doesn't seem to get
dirty so easily. You can wash your car to death, and this stuff
will still unearth dark sludgy stuff from within your car's paint.
You should be able to find it at Pep Boys, or similar chain stores.
If not, Griot's Garage carries it in its catalog. Once you use it,
you won't have to do it again unless you let the finish go too long.
My car has always been cared for, but one day when the car was
directly under bright flourescent lights, my car-nut step-father
commented that the car's finish looked a little dull. I moved the
car outside so he could see how good it looked. After adding the
clay to my bag of tricks, he visited again. We were looking at the
car under the same flourescents and he thought I had gotten a new
paint job.
Even if you don't start with the clay, the following two suggestions
will still apply.
Meguiars #7 is a kind of "paint food" for want of a better term. It
makes your finish feel a little slick, but deepens the color and
removes old waxes and yuck in the process. If you look carefully at
the instructions for the #7, it is to be wiped off when it is still
wet. Smooth it on. Wipe it off. If it dries, you can just put
more on and then immediately wipe it off. If you just let it dry I
can understand why you need a power buffer. It is a mess to get off
once dry.
Again, once you use this stuff, you won't have to do it again unless
you let your finish go.
Substitute #26 for the #9. Twenty-Six (they used to call it
"high-tech yellow wax") is the highest gloss, best looking product
they make. I have been using it for many years, and recently
confirmed that it is still their best stuff by contacting the
manufacturer to see how it stacked up next to the more commercial
products they are now marketing. However, it is not a one-step
product and has little in the way of cleaning properties.
It is very easy to use, and requires no elbow grease. Just wipe it
on, let it dry, and wipe it off. You can use multiple coats if you
want, but it isn't really necessary. I ususally don't let my car
sit around long enough to evaluate how long it lasts, but that is
not easy to quantify for any product. Let's just say I have not
found myself feeling that it had an unusually long or short life.
Once the finish is set up with these three products, you can
regularly touch it up with the "Final Detail" stuff (I don't remember
the exact name or number). You can do that instead of washing the
car when it gets dusty or as the result of a rainy day. Just wash
the car when the wheels get dirty, or a lot of mud splashes up from
bad weather.
The great thing about car care products is that there are a variety
of approaches that seem to work. As with all marketing, the law of
diminishing returns applies. It is possible to spend a lot more money
for only marginally (if that) better results. The Meguiars products
are a good value, and it is possible to get excellent results with
them.
___________________
Date: Fri, 27 Mar 98 12:00:55 PST Just thought I'd drop my $.02 worth about polishing your 7. Try using
cloth diapers for removing wax & polishing the car. They're available
cheaply from Kmart, or just about any other discount store.
...and they will NOT scratch your car's finish like most terry towels do.
Also, the Terry buffing pads that come with most orbital buffers scratch
clear coats causing 'swirl' marks.
I put the buffer on top of a cloth diaper when buffing the car, and voila
NO swirl marks:)
___________________
Date: Sat, 28 Mar 1998 12:29:56 -0800 I have received a few questions about the "Magic Clay" stuff, and I have
a comment on the benefits of diapers vs. terry for waxing.
There are two "Clay" products that I know of out there. One I bought at
a Pep Boys store (an auto parts chain). It is called CLAY MAGIC and
comes with a lubricant to use with the clay bar called #49 Body Shine.
I don't remember the exact price, but I believe the two together cost
about 16-18 dollars. If you can't find it locally, the manufacturer is
Auto Wax Co. Inc. at 1275 Round Table Dr., Dallas, TX 75247. The phone
is listed on the bottle as (214) 631-4000. I bet they can tell you who
sells it in your area.
The second source is Griots Garage, a mail order company of high-end car
care and garage products. Their product is called PAINT CLEANING CLAY
and they get $20.00 for the clay alone. They want you to use their
"Fast Shine" product as a lubricant, so they sell the clay and the Fast
Shine in a set for $30.00. Griot's "Fast Shine" is sold alone to be
used in the same way as the Meguiar's "Final Detail" product I wrote
about before. The real name--I am home, so it is in front of me--is
FINAL INSPECTION (#34). So, if you already have some FINAL INSPECTION
or any other product of the same type it will probably work well with
the Griot's Clay. If you don't already have some laying around, you
might as well try the Griot's product. It will be good, if pricey.
Regarding the kind of cloth to use:
Be advised that most K-Mart type diapers and many terry cloth towels
contain polyester threads along the borders. These threads will scratch
paint. If you have doubts, hold a lighter up to the corner. The
polyester will quickly burn and turn black.
The problem with using Cotton Toweling, even if it contains no
polyester, is that you have likely used it for other things beforehand,
like removing wax or drying the car. You may also have used fabric
softener when you washed it. My take on this is that it is probably
harder to remove bits of grime when you wash toweling than it is to
remove bits of grime from a smoother cloth like diaper material. Few of
us buy new towels for car polishing, so the ones you use may carry a
tiny bit of grit with them, which would cause swirl marks.
Thus, there is merit to both sides of the discussion. In the end, it
probably matters more that whatever you use contains no built up grit or
polyester threads than anything else. The real detailing nuts out there
have separate stashes of cloth that are only used for one type of work.
Griots even sells towels with "Wash," "Wax," and "Dry" woven in to
them. They are, of course, costly. Griot's number is 800-345-5789.
___________________
Date: Sat, 28 Mar 1998 15:00:16 EST JC Whitney also carries a type of this clay stuff. In their "spring fix up"
catalog, its on page 160, part # 71BF0556N. $11.95 for two 4oz bars. I
believe I've seen another brand elsewhere in the catalog, but not sure where.
My friend uses it on his car and says that it works really well.
___________________
Date: Fri, 27 Mar 1998 00:47:57 -0500 (EST) I've just used "Liquid Glass" for the first time on the recommendation
of a friend. This stuff is amazing! It's not actually a wax, rather a
compound that forms a clear, hard finish over the paint. I used it on a
new bike, before it saw the road.
For cars that have seen some use, clean with car wash, then use the
Liquid Glass precleaner, then a couple of coats of Liquid Glass. I plan
on doing the '7 as soon as I get it repainted. (Baby has that well known
rust spot forming under the 3rd brakelight ... +sigh+)
___________________
Date: Sun, 29 Mar 1998 13:49:24 -0500 With the repaint on my car, I generally wash the car body panel by body
panel using zymol soap, and constantly rewetting it so none of it dries
before I'm ready to towel it off. The painted wheels can take a little
while to do if it's been a while, so I generally spray the car down to get
it wet, avoiding the wheels, and then I spray each entire wheel with
castrol super clean. That works a lot of the crud free from the wheel
(especially those tiny little divets on the T2 wheels), and seems to be
perfectly safe on the paint.
From there I wash the car as normal, starting from the front and working
back down one side and around to the other. Sometimes I do a given body
panel more than once, especially the hood and roof. Then I use soap and
the cleaning implement to do the wheels (thus avoiding getting wheel crud
in the mitt and then using it on the car body). I towel it dry with some
clean bathroom towels which, in my experience, is perfectly safe as long as
you are reasonably careful.
When the paint was old, I usually used the mother's pre-wax cleaner about
once every two to three months, and I waxed the car with either mother's
wax, meguiar's, or zymol every time I washed it. Now I generally just go
over the car with zymol after washing it, the paint and clear are smooth
enough that something like precleaner is just going to swirl it up.
And on one final note, I want to present a defense of the Zymol that is
made in the US by turtle wax. I have used literally every product that
I've been able to find, and at one point had a collection on my shelves
that looked like the inventory of a trak auto. And even including the
mother's and the meguiar's (have not used griot's, but consieder them
somewhat over-rated), the Zymol proved to have the longest endurance by far
when compared to everything else. Mother's scarcely lasted more than two
weeks if it rained once or twice, and the Meguiar's generally made it
slightly longer (three weeks), but the Zymol from the auto store easily
withstood a month or two before it needed to be reapplied. The zymol (I
only ever use liquids) provides just as good a shine as the others, and is
just as easy to apply, it even smells good if you care. Given its
outstanding performance in a high-acid area like norfolk, and DC (with it
ridiculous weather cahnges over a given time period), I think that blasting
it just because it is made by turtle wax in the US is totally out of line.
And in case anyone is wondering, I checked. None of the waxes that smell
really great taste the way they smell. They all taste like wax. Period. ;-)
___________________
Date: Tue, 15 Dec 1998 21:07:05 EST I have tried dozens of different
waxes, including Meguiars, Zymol, Mother's, Eagle One, One Grand Blitz, etc
etc. But the best I have ever used in terms of both shine AND protection is
Zaino!!!
I have not personally tried the liquid glass, but have talked to several
people who have converted from liquid glass to Zaino....they like Zaino
better.
Trust me on this. Zaino is the best polish that you can purchase on the
market today. No I am not a distributor. You can only purchase it by mail.
Check out their website Zaino Bros' Show
Car Polish Products.
And for more "independent" reviews, you can check out the Edmunds website
under the heading in the "Smart Shopper" category under the title "What is the
Best Wax/Polish?" You can also visit the ___________________
Date: Sun, 10 Jan 1999 11:46:20 +0000 A month or so ago, someone posted about a new line of paint care
products. I am on the road and don't have his name (he deserves
credit), but largely due to his urgings I decided to try the stuff. This
is the story of how it went. From the outset I ask you to consider
that I have no technical knowledge of this kind of product nor do I
have any affiliation with any car care company. I'm just a car nut
like you, stuck in an airport with a fresh battery for his laptop and
trying to figure out what is best for his pet car.
[It is 2:00 and my flight from Tampa to Baltimore has been delayed
from 4:10 to 5:10. This is par for the course for January.]
I have used Meguiar's products for the last 10 years, and in spite of
high pressure tauntings from infomercials claiming I could make
my paint blow-torch proof if I just spent 20 seconds applying their
miracle paint glaze to the finish, I have stuck with Meguiars and
have no complaints. Even the opportunity to spend megabucks on
the "boutique" Zymol products did not attract me.
This new stuff was from a company called Zaino, and I learned that
the guy behind it is named Sal Zaino. The web site at
www.zainobros.com had the usual technobabble full of superlatives
and promising instant immortality with the use of his products, but
it was not enough by itself to make me jump from my current
routine. Besides, I had just purchased four bottles of Meguiar's
"Final Inspection." (That's the spray on, wipe off stuff that can take
the place of a wet wash as long as the car is not too dirty--real
good for removing that clingy dust the car seems to attract.)
I contacted the guy from the list who spoke so highly of the Zaino
products and he pointed me to a photo of his car on the web.
There was also a web discussion on the Edmunds site about the
best car wax. His car certainly looked shiny in the picture. It was
a silver 3rd gen and the reflection of the sky on the hood was so
strong it was hard to tell where the car started and the sky
stopped. This was inconclusive to me because the paint on my
car is mostly 14 years old and is not clear-coated.
By reading a few of the postings to the discussion group I learned
that Sal Zaino had responded to an email question, so I wrote him
a long note about what I was currently using, and what I wanted
from a good paint care product. In short, I told him I wanted a good
shine but I didn't want to do any more work than I was already
doing. Basically, I am lazy. I asked him a bunch of questions.
The response came in a few hours.
He invited me to call him.
He went over my questions point by point. Some of it was what
you would expect from a guy with something to sell. Some of it
was new, and unlike any product I had encountered before. I was
curious enough to send him a check for five bottles containing
various kinds of goo to smear, spray, and slather on the car.
Sal and others had recommended genuine (threads and all) cotton
towels for removing their products, so while I was waiting for the
stuff to arrive I shopped the after-Christmas sales, and joined the
ranks of car enthusiasts who have better towels for their car than
for their family--a fact that did not go unnoticed by my wife and step-
daughter who pierced my heart with raised eyebrows. I remained
strong. With big decisions like this, a man has gotta be a man.
Let the women make the little decisions like where we are going to
live, how to manage our retirement funds, and what schools the
kids will attend. Nobody's gonna tell me I can't use fluffy white,
"Made in America," Egyptian cotton, oversized, luxury bath towels
for my car. Skin heals, but scratches on your paint last forever.
And I didn't just buy the towels. No sir! Motivated by an
overabundance of testosterone, I threw those beauties into the
washer (on hot, of course) and dried them without fabric softener.
I was ready.
[The flight has been further delayed until 6:10, and there is a nasty
thunderstorm approaching. The temperature in Baltimore is
dropping and black ice is expected on the roads.]
You can't buy Zaino products in stores yet. They are sold via the
web page. Zaino doesn't take credit cards, but Sal says he ships
the same day a check arrives. True to his word, the stuff got to me
on the day before New Year's Eve. I had to leave town on January
2nd, so I had only two days to play with it.
Zaino uses a numbering system for their products (Z-1, Z-2, etc).
Some of the bottles had the number held on with tape, so it was
clear that Zaino was not exactly a high tech marketing operation.
It was the morning of New Year's eve before I had to to get started
with the products.
The worst news is that you can't have any non-Zaino products "over
or under" Zaino products. The technology is different. Thus, the
first step is to wash the car with Dawn dishwashing liquid. Sal said
Dawn was alkaline, so this strips anything off--very important since
none of the Zaino products contain abrasives or harsh solvents, and
they are not the best on "naked" paint for dealing with water spots
or stains. A session with Clay Magic is recommended for
removing paint surface contaminants, but I had done that last
Summer, kept the car well waxed, and had not driven the car many
miles since, so I skipped it.
Needless to say we had a visit from a nasty cold front which put
night time temperatures in the teens. I waited for the warmest part
of the day and went out to wash the car in the 27 degree (F) air.
I'm sure the neighbors were entertained by the sight of a guy in a
motorcycle cold-weather suit washing his car as the snow was
falling, not to mention the language when I discovered that I had not
quite drained all the water from the hose last time I used it. It was
frozen. After a few choice words, I took the whole thing inside and
immersed it in hot water to thaw. The car was warm from the
garage and I had the engine running to keep the hood warm. Once
the hose was clear of ice, I made quick work of the wash job. Two
days later there were still frozen Dawn suds in the driveway.
After drying the car, I took a moment to notice how ragged the car
looked without benefit of wax or polish. Fourteen years of wear and
tear had left its collective marks--long hidden by the fine products
from Meguiars. Oh, well. Too late to go back now. Might as well
get on with it.
I went for the bottle of Z-1. They call it Polish Lok (tm) and It is
supposed to act like some kind of go-between to help the polish
connect with the paint. The instructions were simple: Spread it on
thinly and leave it there. No problem. The stuff smooths on like a
gel, quickly levels itself, and most of the swirl marks and fine
scratches just vanish. Whoa! I figure it took only about an ounce
to do the car. The white applicator (thrown in with the deal) was
showing some brown stuff on it--much like Clay Magic brings up.
Considering that my red paint had been ravaged by Dawn
dishwashing liquid, I was frankly impressed that there was more
sludge to remove. This verified Zaino's claim that the product:
Yup.
The next step is the "Show Car Polish." There are three options.
Z-2 is a high gloss finish for clear-coated paint. Z-3 is a high gloss
finish for non clear-coated paint. Z-5 is less glossy, but further
hides fine scratches and swirl marks. You can apply any of the
three over the Z-1 after it hazes, or even when it is still wet. I went
with Z-5 for the next step since I wanted to further hide the little
scratches. Sal recommends using Z-2 or Z-3 for the last coat
since it offers a higher gloss. From here on I will refer to the Z-2 or
Z-3 product as Z-2 for simplicity. Most of you have clear-coated
paint anyway.
The combination of Z-1 and Z-5 dries in about an hour. Sal says
drying time is temperature and humidity dependent--anywhere from
five minutes in the Arizona sun to three hours at 38 degrees (F). A
quick wipe with your finger on a hazed section will tell the tale, but
you can also leave the stuff on the car all night if you want. When
dry there is hardly enough haze there to talk about, and it comes
off without leaving waxy crud in door seams or other pesky places
(like the tiny raised lettering on the clear plastic tail light covers)
that require a toothbrush with the Meguiars. It is also decent on
rubber, and does not produce an artificially glossy appearance. It
only took about an ounce of each product, verifying Sal's claim that
an 8-ounce bottle will do eight mid-sized cars. Other benefits for
the system supposedly include:
When the #5 dried, I towelled it off and stood back. As I said, the
#5 is formulated to further hide swirl marks and tiny scratches. It
is not supposed to be the final coat. Nevertheless, I took it out in
the sun to get a better perspective. It looked good to my eye. The
phrase coming into my mind was that my non clear-coated paint
looked "darker," but "deeper" would do just as well. I made a short
trip in the car and something interesting happened. As we started
to move, the little bits of dust that had collected on the hood while
the car was in the garage just fell off. Sal had mentioned the
product's anti-static properties, but this was pretty nifty.
Taking stock I can say that the car looked at least as good as it
did with the Meguiar's products, and the amount of work involved
had been minimal. If Sal's claims of longevity, resistance to
washing and the other stuff was accurate, I had made a good
choice. I put it away for the afternoon and celebrated New Years
with my wife.
[They have closed the airport because of the storms. Planes are
circling. Some have been diverted to Jacksonville and Ft. Myers as
they run low on fuel. My flight is now scheduled to leave at 7:10]
New Year's day, I went back to work on the car. While the system
is supposed to exceed the longevity and shine of competing
products by a wide margin after only one coat, fun starts when you
start layering coats of the polish. Being non-abrasive they are
designed to bond with each other.
Here is how it works: The previous coat must cure. Above 70
degrees it takes a minimum of 6 hours. Anything below that, and
you are instructed to let it cure for 24 hours. Once cured, you
prepare the surface by using Zaino's "Final Inspection" type
product. They call it Z-6 "Gloss Enhancer Spray"--a quick, wipe
on, wipe off operation. After that, it depends on what you want to
do. You will get the maximum amount of "de-scratching" effect
from Z-5 after three coats, but they don't have to be consecutive. I
figured I would use the Z-2 as a finishing coat. Then I could decide
iwhere to go from there. Additional coats are supposed to make
the car look better and better. I will report as time passes and I
have a chance to play with it more. I have heard of people piling
five or eight coats on their cars, so there must be a reward for it.
As with all the Zaino products, the Z-6 was a breeze to use, and
the Z-2 went on and off with ease. I can't say that there was a day
and night difference under the fluorescent lighting in the garage,
and by the time I got the car outside the sun was going down, so I
never did get a good look at it before hitting the road.
[The flight has been delayed again, and is now scheduled to leave
at 8:10. The weather map has a flag over Baltimore that says:
"Sucks." They say Baltimore is fogging in.]
The bottom line at this stage is that I see no reason to switch back
to the Meguiars products I was using. Once on the Zaino system,
the products are competitively priced, easy to use, and they
reinforce one another. The car wash, for instance contains
additional UV blockers, water-based lubricants and polish. Sal
says it sheets off leaving no water spots. He claims to be as lazy
as I am and dries his car by driving it around the block. Apparently
the car wash actually improves the shine. I can't find a car wash
that has that effect with the Meguiars products.
I can't provide a personal testimonial at this time about the shine
(relative to other products), and I don't really know how long it will
last. However, I can say that the car looks terrific as it is, and from
what I've seen so far, the amount of work necessary to keep it that
way will be minimal. Supposedly, you only need to re-apply Z-1
every six months to a year. I suspect it will last a very long time
since whenever you use either the car wash or the detailing spray
you are at the same time revitalizing the major functions of the top
coat of the Z-2 or Z-3 polish. Sal says that's all that is necessary,
and you can put on another top coat of Z-2 or Z-5 whenever you feel
it is required.
So, if you are looking for a winter project, and you want something
that looks terrific, lasts a long time, and is easy to use, check out
the Zaino web site. This guy has developed some very special
products and as a small business he deserves your consideration.
More importantly, virtually everything Sal told me in our
conversation has been right on the money. He has earned my
trust and respect.
[7;30PM: The field is open again and flights are starting to arrive
from everywhere. Ah! Here comes the plane. Looks like I might
make it home tonight.
8:10PM: There are too many planes requesting fuel (some diverted
from other airports in the path of the storms) so we have to wait our
turn.
8:40PM: There is a lady in the next plane who is having a medical
problem. An ambulance has just pulled up and is dealing with it. I
don't see the fuel truck yet, but I can smell the stuff, so it is
probably out there somewhere. In any case, we can't back out of
the gate until the ambulance moves.
9:00PM: The 4:10PM flight for Baltimore leaves the ground. It
landed safely in Baltimore (no fog) at 10:45.]
Good night.
__________________
Date: Sat, 22 May 1999 13:52:35 -0400 With everyone chiming in about the astounding results from Zaino, I thought
I might as well add my $.02.
First let me say, that all the exuberant expounding over the exquisiteness
of Zaino had me prepped with high expectations. I figured that I had
finally found that magic teflon-esque coating for the car that would
eliminate the need for bras to keep bugs off, car covers, car washing with a
bucket, and so forth.
Imagine my surprise when dust was not repelled (the Z-6 label says
"Antistatic formula repels dust")! Sigh. Dust and pollen still settle and
stay on the car until you do something about it. However, dust is NOT
attracted like it is after buffing other products which leave a static
charge on the surface. Here are some other expectations I gathered from
list or label reading, and what I found.
True: Zaino shines like crazy. The literature is correct when it says the
finish will glow. I had never seen my wheels glow like that until after
applying just one coat of Z-2.
False: Zaino always provides great results. You have to be careful about
application to some extent. I found that applying Z-5 with back and forth
strokes as recommended left back and forth marks after removal. Perhaps
another coat would have helped. Re-applying witih circular motion was
better.
True: Zaino is easy. It goes on and off so easily that putting on extra
coats is no bother. It IS fun. My only comment here is that on dark colors
at least, it was hard to see where Z-1 had been put on, and whether it had
dried or not. Dry to a haze? What's that?!
False: Zaino eliminates scratches and the toughest swirl marks. Zaino
REDUCES the appearance of such defects. Perhaps with 3-4 coats of Z-5 I
would think otherwise. However, for some defects I believe an old-fashioned
abrasive type polish or cleaner are still indicated.
True: Water falls off of Zaino surfaces. It's amazing. If it's just
dust-covered, you can in fact wash the car by just spraying with a hose and
then driving to dry it. So long, chamois.
False: Dust falls of Zaino surfaces. The dust/pollen which has settled on
the car doesn't blow off while driving, at least not for me. Maybe a little
of it does - but not most of it.
True: Even if you don't dry off the car after washing, water doesn't spot
like it does with other products. The spots are there, but they are much
slighter than I'm used to seeing.
True/False: Z-6 works a lot like Rain-X on glass surfaces, but I believe
Rain-X works a little better, i.e. water will slide off a freshly Rain-X'd
surface at lower mph than a Zaino surface. However, Rain-X is much harder
to put on without streaks.
False: Bugs fall off of Zaino surfaces. This is my only major
disappointment. The bug splats still stick and require the usual amount of
rubbing to remove from the nose. Bugs stick to Z-6 coated windshields too.
I've used other polishes (Nu-Finish) which, for at least a few days after
application, splatted bugs would dry up and brush off easily. If anyone has
any tips about how I can get a more bug-repellant application of Zaino, I'm
all ears.
True/False: Apply in sun or shade. Z-1, Z-2 say sun or shade on the label,
but Z-5 calls for a "cool surface" so that means shade for dark finishes.
Z-6 has to be removed before it dries so that also calls for a cool surface.
True: The leather conditioner makes the interior smell like a tanning shop.
Of course it only lasts a few weeks.
And one claim which I don't recall seeing mentioned.
All Zaino products smell great. They're not like any wax or polish you've
ever used. Z-6 and Z-7 are fruity, you'll swear Z-7 car wash is grape
Kool-Aid. Z-1, 2 and 5 reminded me of shampoo or hand lotion. It's really
weird to have these smells when using the stuff. I think Sal Zaino went
overboard on the fragrance additives, just a little. Or are these smells a
by-product of the gloss enhancing ingredients?
Overall rating - 4.5 stars out of 5. Have I used anything better? Nope.
Worth the investment? Sure, but I wouldn't pay more. If all my
expectations had been met - I'd pay triple.
I'm sure this will engender a lot of feedback from the Zaino Zealots.
Please be assured I followed label directions, and information provided to
the list from Zaino (clay/Dawn/big-cotton-towels/etc.). About the only
thing I haven't had time to do is multiple coats (other than Z5 followed by
Z2) separated by a day for each coat.
__________________
Date: Wed, 07 Apr 1999 18:43:13 PDT Here's what Sal says:
The Z6 "trapped" between the layers is where the shine comes from.
Oh, and there's no wax in the product. Sal stresses that (no
silicones either - thus no Clay spray).
Good luck. BTW, if you want to start over, Dawn will take Zaino off,
use the Zaino car wash to "feed" the finish (Sal can sound like a
salesman).
__________________
Date: Tue, 4 May 1999 10:13:31 -0500 Due to the overwhelming response for the Zaino Tips I'm just going to post
them to the list. This is sort of an addendum to the list on his site, it
includes much of the same information but gives a few extra tips for those
less car savvy such as myself, this is the process Sal personally
recommends in Zainoing your car for the very first time:
Thank You for your interest in Zaino Bros' Show Car Polish Products.
Enclosed is a more detailed version of my Application Tips & Tricks.
Please read thoroughly. It contains some really great info.....
ZAINO APPLICATION TIPS
Clay Magic (blue clay bar) was designed to remove airborne contaminants,
paint overspray, water spots, rail dust, industrial fallout, diesel fuel
& catalytic converter residue and any other bonded surface contaminants
from paint. All cars even brand new factory paint has airborne
contaminants... Here's the deal. The non-abrasive Clay Magic will remove
any surface contaminants from the paint finish and not hurt the
clear-coat. Clay will get that paint finish smooth as glass. Now
remember waterspots, bird droppings and bug guts if left on the
paint finish for any length of time. Will etch into the paint finish.
The Clay will also remove any polish. You will find Clay Magic in most
Pep Boys or Autozone stores in the polish/wax section. If you don't see
it ask for it. Clay costs approximately $19.95. If you still can't find
it, call me...
I recommend you use my car wash (Z-7) as a lubricant for the Clay. If
fact Z-7 works better with the Clay than any Clay lubricant I've tried.
Just make sure to keep the surface area lubricated while using the clay.
Use 1 capful of Z-7 Car Wash to 12 ounces of water. I use a spray bottle
for the mix. Shake it up and spray the area to be Clayed. Just make sure
to keep the surface area lubricated while using the clay.
I don't advise making a habit of washing your car with Dawn. But for
this scenario it's fine. High alkaline products like Dawn are tough on
polishes. It will never harm the paint finish though. A car wash is made
specifically to clean without removing durable polishes. ALSO, Make sure
you remove any water spots, before you apply my products. Because Zaino
has no abrasives or harsh solvents it will not remove water spots or
stains. Clay Magic is great for removing any paint surface contaminants.
Even if you use the Clay procedure. Follow up with a Dawn Wash just for
added insurance...
To test if Z-2 or Z-5 is dry and ready to be removed. Wipe your finger
on a hazed section. It should immediately come off and leave a crytal
clear finish. If it smears, it is still wet. You can leave Z-2 or Z-5 on
for hours or overnight if you desire. When it is not humid Z-2 will take
anywhere from 30 to 60 minutes to dry. Depending on how heavy you
applied it. I have applied Z-2 in the Arizona sun and it dried in
approx. 3 to 5 minutes. I have also applied it in 38 degree temperature
and it took about 2 to 3 hours to dry. Be patient. It's worth it.
Different situations affect drying times. Also, remember you have Z-1
and Z-5 both on the car. That is two products that have to dry at one
time. Takes longer. Z-2 or Z-5 does not contain any oils and once it's
dry will never ever look smeary or feel greasy. If you remove Z-2 or Z-5
before it is thoroughly dry and get any smears. Just wipe down the car
with a damp cotton towel. This will remove any smears. Don't use Z-6
until you wipe the car down. If you'd like call me and I'll help you out
with more info!
NOTE: One application of Zaino Z-2 or Z-5 will outlast anything in the
industry and is all you'll ever need for an average vehicle. However,
Multiple coats will achieve an even deeper, wetter-looking, ultra high
gloss. Plus higher paint protection. It's up to you....You be the
judge...
ALWAYS use only 100% Cotton towels. They must be Made in USA. Brand name
(Cannon or Fieldcrest) large white bath size towels. See my web site,
for the real truth on cotton towels and which ones to use.
Call me and I'll give you some more tips on your specific situation.
Thank You, __________________
From: Tobin Tracy (TPTracy@MartialArtsRegistry.com) As I was reading your comments about waxes, I thought I would write to
let the viewers know about a wax I use on my black RX7. Because black
shows swirl marks, it is difficult to choose the right wax. I have
tried everything from the Color matching waxes to profession detail
waxes. The only thing I found to work great is WAX SHOP's Clear-Coat
Liquid Wax with natural carnuba wax. Its in the white bottle. To keep
the swirl marks from appearing, wax your car with a damp sponge (use
very little wax - as if you are washing your car). After 5 or 10
minutes, it just wipes off without any residue. Swirl marks are caused
by the powdery residue being wiped back into the paint. I feel like a
salesman. I have nothing to do with this company. I just like their
one product.
(Ed.'s note: the black 3rd gens do not have a clear coat. So I
am not sure if this wax is for cars with clear coats, or simply
makes the finish shine like it had a clear coat. --Steve)
__________________
Date: Sat, 28 Mar 1998 13:08:51 -0700 There is an excellant writeup on waxing on the
mr2.com site.
___________________
The San Diego Miata Club has an excellant write-up on
waxing
--Steve.
____________________
To get rid of wax on plastic trim - use Mothers Back to Black.
Or peanut butter. I am not kidding. I did not try this, but tons of
people wrote in saying it worked miracles. I am assuming creamy instead
of chunky. Skippy or Jif were used, both worked. I just use the Mothers
Back to Black. --Steve
_______________
Date: Wed, 19 Nov 1997 12:49:08 -0500 (EST) Mazda has a product on the market called "Bumper Black". Here is
what is printed on the can:
Genuine Mazda I forgot how much it costs .... $3 or $4 for an 11 oz. can .... I think.
__________________
Date: Tue, 12 May 1998 14:38:06 -0500 Tree sap and a host of other maladies can be safely and easily removed
with chemicals such as PPG Ditzler's DX-330 AcryliClean. Other paint
manufacturers will have similar products, and they can be found at any
reliable auto paint store and sometimes at the larger auto parts depots
such as CarQuest and NAPA.
__________________
>What do I use to clean the door interior panels?
Simple Green has been recommended by a lot of people for the interior
vinyl panels. It is supposed to get rid of the scuff marks that build up
on the door panels. --Steve
Photos courtesy of Tim Henderseon, trubble@cet.com, of
http://www.revolutionrotary.com e-mail skip@revolutionrotary.com.
Thanks for letting me post these!
ANd a different kind:
Date: Mon, 18 Sep 2000 11:31:24 -0500 Part #15559 $5.95
12A rotor works for sure. The face just fits in there snugly. Paint or
polish rotor as needed. :-)
All praise goes to:
Mike 1993 Touring who provided the list with this info.
From: Steven W Dillon
>Does anybody know if the Erebuni kit and the PFS kit are identical?
>EXACTLY identical?  Anybody tried them?  Any fitment problems?
From: Terry Ferragame (ferrater@pentamation.com)
From: "Steven M. Robertson" (smrinjpn@typhoon.co.jp)
'99 Front End
Date: July 12, 2000
>The Lightning in a World of Thunder web site has a picture of two 3rd gens on
>the opening page, one red and one white. I wanted to know if you know who
>makes the nose clips that they have on them with the driving lights in the
>turn signal location.
From: Wael El-Dasher (wael.el-dasher@efini.net)
Carbon Fiber Hood
From: "Glen" (glen@rx7.net.nz)
From: "Hung-Jen Hung" (hhung@inreach.com)
From: "Hung-Jen Hung" (hhung@inreach.com)
>for the big hole) that these might not be a stock body panel?
>Is there any noise penalty? Additional vibration?
From: "Hung-Jen Hung" (hhung@inreach.com)
From: hover3 (hover3@gate.net)
>
> Has anyone seen the carbon fibre hood on page 46, August 1997 Super
> Street magazine?
> It's on a Yellow FD.
> The car has "Performance Consultants Inc" accross the windshield, does
> anyone know how to contact them?
From: "Houseman, Carl W. x1323" (CHOUSEMAN@genicom.com)
From: Josh Ross (suppersppy@earthlink.net)
From: dale.black@pnc.com
From: dale.black@pnc.com
From: "tworx7s" (tworx7s@zbzoom.net)
Subject: (rx7) [3] FasPac CF Hood Update
Doors (including "gull wing" or "scissors" types)
From: "Jim LaBreck"
Subject: RE: (rx7) Gull wing and body kit?
From: Gary Heston
From: "Cassada, Lewis"
Windshield
From: Wael El-Dasher (wael.el-dasher@efini.net)
From: "Edward H Kim" (ehkim@erols.com)
Rear Window Shade
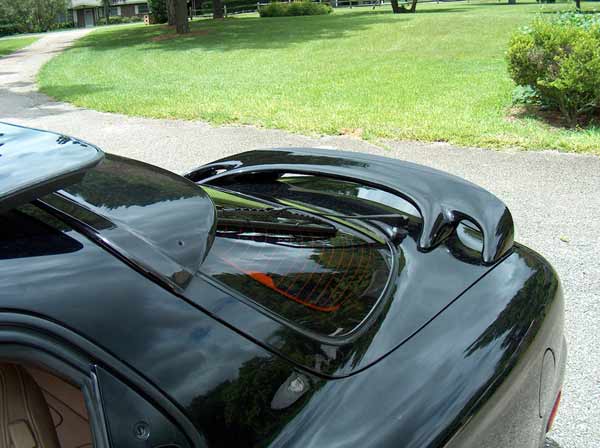
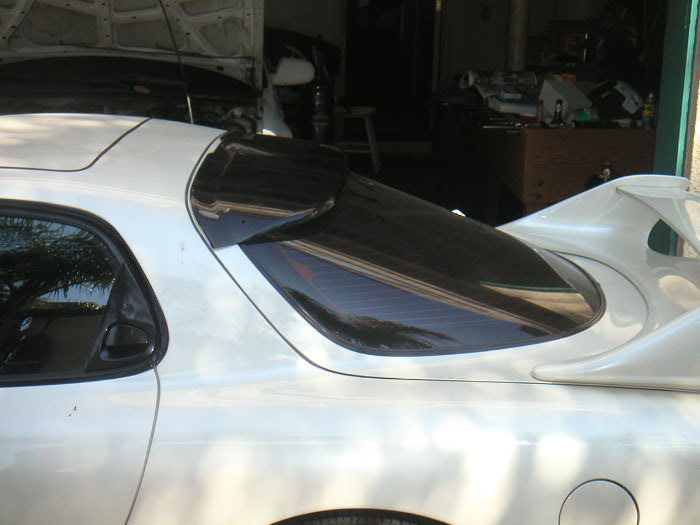
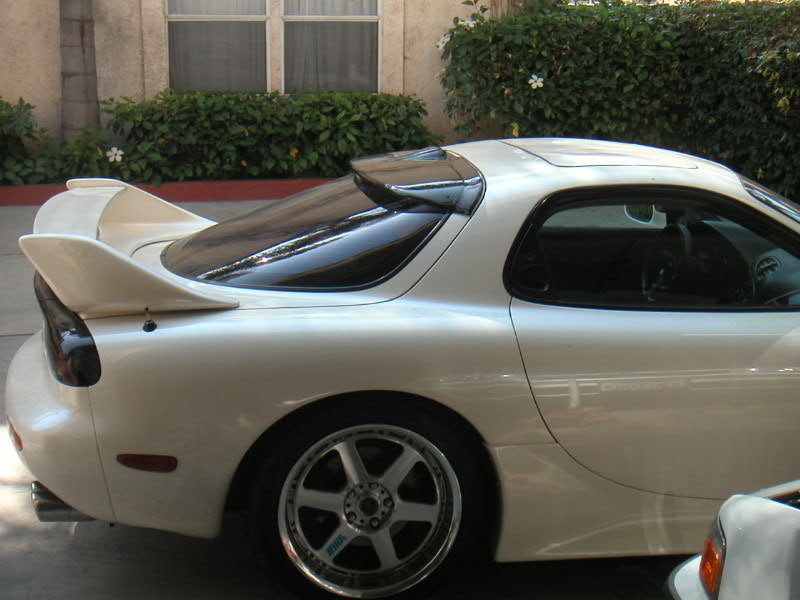
Car Covers
Date: May 9, 2000
Keys
From: "Hoskinson, Jeff/EXEUG3" (jjhoskin@pscnet.com)
Sent: Monday, January 31, 2000 11:18 AM
Efini Badges
From: Steve19Yz@aol.com (Tim Benton)
Sticker
Seats - Aftermarket
From: "Edward Mandac" (ed@texar.com)
Subject: (rx7) [3] Racing seat clearances vs. stock?
Brake pedal to front of seat (horizontal):              23"
Floor to bottom of steering wheel (vertical):           14"
Top front of seat to steering wheel (vertical):          6"
Center of steering wheel to back of seat (horizontal):  28"
   (inclined to my driving position)
Front of seat to roof (vertical):                       28"
Back of seat to roof (vertical):                        35"
From: "W.S. Bill Gammon, Jr" (grandprix@citynet.net)
From: "Nick Riefner" (racin@worldnet.att.net)
From: David Breslau (breslau@space.mit.edu)
From: Johnny and Tracy (spdntrxi@pacbell.net)
From: Victor Masch (vmasch@mindspring.com)
From: SuprProbe@aol.com
From: Jed Thompson (JThompson@Chemnavigator.com)
From: "Wilson, Mike" (MWilson@unispherenetworks.com)
Subject: (rx7) [3] seat to steering wheel clearance
From: Drew Blair (Drew.Blair@billingconcepts.com)
Seats - Rear
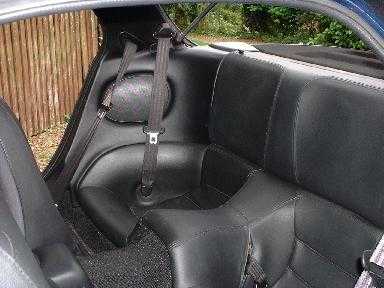
From: "Hoskinson, Jeff" (jjhoskin@pscnet.com)
Steering Wheel
From: Rob Robinette (robrobinette@sprintmail.com)
From: Rob Robinette (robinett@postoffice.dca.net)
From: "Paul De Ruyter" (P.Deruyter@btinternet.com)
From: "Hedwig Poon" (hedwig.poon@encompass-tech.com)
From: "Brad.Barber" (Brad.Barber@alsformal.com)
From: tferragame@webtv.net (Terance Ferragame)
From: brad barber (bradrx7@swbell.net)
From: Gordon Monsen (gmonsen@fast.net)
Subject: Re: (rx7) rx7 [3] anyone have a removable steering wheel?
> I've been thinking that a removable steering wheel would be a good security
> feature. Has anyone installed a quick release on their FD steering wheel? If
> so could you let me know what product you used and how well you like it?
>I was looking at the Mazdaspeed steering wheels on your site.  Could you tell me
>what the diameters are for these?
From: Gordon Monsen (gmonsen@fast.net)
From: "Hedwig Poon" (hedwig.poon@encompass-tech.com)
Subject: RE: (rx7)[3] Quick release steering wheel
> Has anyone out there any experience with one of these?  It's for a track
> only application, I'm considering the Longacre splined unit.
> There is an available adapter to work with Momo/Sparco wheels.
From: Shane Baker (sbaker@null.net)
Carbon Fiber or Metal Dash Kits
Date: Thu, 3 Apr 1997 20:37:09 -0500
From: richardt@lava.net (Richard H Thomason)
From: richardt@lava.net (Richard H Thomason)
From: richardt@lava.net (Richard H Thomason)
From: SHiCHiX@aol.com
Subject: (rx7) Metal Dash kits for RX-7?
Pedal Replacements
Date: 10/30/98
Price: $50 (when I bought it)
Sizes: Small and Large (ask David for details)
Gen: 3d Gen only
Contact: David Breslau
From: David Breslau
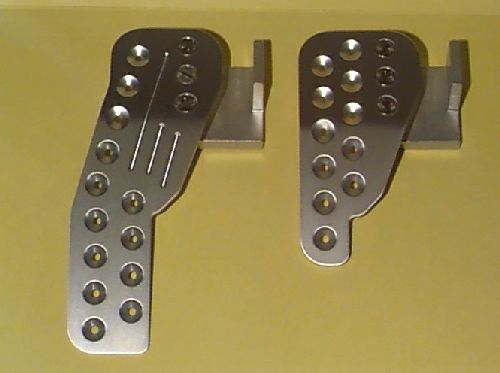
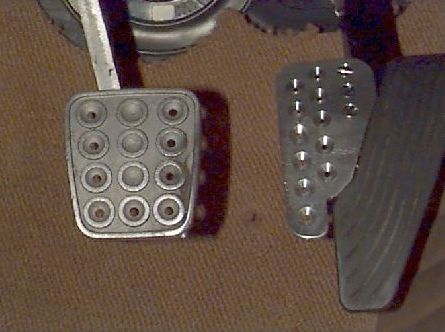
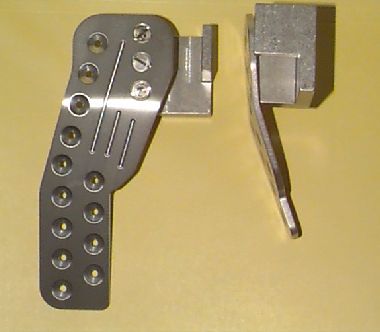
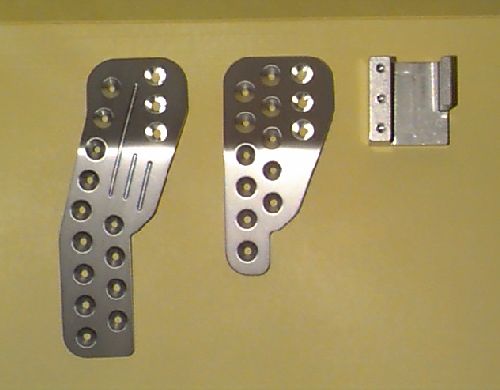
        Duane Krumweide
        Crooked Willow Composites, LLC
        619.273.7735
From: "Steve Wynveen"
From: TS Penn
From: Gene Kan
Gauge Face Kit
From: Tim Stiles
Stereo Info
**********
**********
**********
**********
>theft deterent system?
From: Martin Crane
From: Mark Mucher (mm@iu.net)
Subject: Re: (rx7) Re: radio volume knob
From: "Drew" (drewm@earthlink.net)
Subject: Re: (rx7) Re: radio volume knob
Part Number  Exact nomenclature
-----------  ---------------------------
FD01-66-BC1  Knob, volume tuner and deck
FD01-66-BC2  Knob, bass/treble
From: "Jonathan S. Ott" (jott@directlink.net)
Gas Caps
From: brad barber (bradrx7@swbell.net)
> for a 3rd gen?
AirTech
Date: Wed, 21 Jun 2000 16:21:03 -0500>BR>
From: "Tierra, Rhoel" (r1tierr@nppd.com)
Carpet
From: "John Golitsis" (jgolitsis@home.com)
Date: March 26, 2001
From: TurboRL7@aol.com
Subject: (rx7) [rx7] VHT carpet/vynal dye (results)
Floor Mats
From: "Eric B. Schorvitz"
Cargo Net
From: "Hoskinson, Jeff" (jjhoskin@pscnet.com)
> I have lots of trouble keeping stuff from sliding around in the back
> of the car.  I'd like to put about 8 eyes to the bottom of the trunk going
> through the carpet, and some rubber bands and/or cargo nets to keep stuff
> from moving around.  Has anyone done anything like this??
From: Hollywdwrd@aol.com
Cup Holder
From: marc (cardmarc@concentric.net)
Marc Wiese
3484 Milford Cove
Collierville, TN  38017-3606.
Waxing
From: Nathan Freedenberg
Car washing soap. Works very well, does not remove wax, gets the car clean.
You MUST use this before waxing the car the first
time with Zymol. There is a brand new formulation out. It was just released
last week. It's creamier and darker than the older one. It also has a
choco-almond scent to it. It works very well to remove dirt you can't see
and removes fine swirl marks and scratches.
Depending on color and origin of car you
pick one of these. They are all very easy to apply On good clean paint they
shine very well. Not used like regular wax, you do NOT allow the wax to
dry. Expensive yes, cost effective, yes. A little goes a long way. You
should be able to do you car 15-20 times from one container. Steep learning
curve with this stuff. The first time the car will look ok. As you use it
more and become familiar with it's needs the car looks better and better.
Carnauba content is 37% yellow Carnauba
This is getting into the *Estate Glaze* line. The
actual Carnauba content is 47% (90% white 10% yellow) This is harder to
use. It is granular due to the high Carnauba content. You have to use your
hand as an applicator. The heat of your body is required to melt the wax.
The shine is better than above waxes and lasts ~1 month with washings
thrice weekly, outside storage and no cover. My wax of choice. I get about
25 waxings from a container. Car must be buffed again ~5 hours later for
max shine
51% #1 white Carnauba. I have a 2 oz sample. I have yet to try it.
60% #1 white Carnauba I have a 2oz sample. I have yet to try it.
61% #1 white Carnauba. The most anyone has been able to get in suspension
with the carriers needed to apply. I have a 2oz sample. I tried it Sat night.
It gets applied the same as all the Estate Glazes, with your hand. Initial
thoughts. Paint is DEEP. The shine is phenomenal. My neighbors thought I
had the car repainted. You have to buff again 5-6 hours after initial
application. It also needs to sit in the sun for a few hours the in Initial
waxing. I was unable to do that.
A quick detailer. Good for fingerprints and
smudges. If you have bugs or something the needs a solvent try the
Mequiers. For quick clean up of a clean car the Zymol works well.
Zymol's Armor All. Works great. No shine like Armor All and related products
have, just a nice clean matte finish.
From: "David Lane"
>Inspection. Awesome shine and last around three months. The
>only problem is that take me 4 hours to finish the job (with
>help of a buffer).
From: RBK1%MATS%DCPP@bangate.pge.com
From: "David H. Lane"
From: MazdaRX7 a
From: rali@world.std.com (Reto Lichtensteiger)
From: Tuck
From: Rob360@aol.com
From: "David Lane"
    "deep cleans, conditions and prepares paint finish for Show
    Car Polish. Forms an optically perfect, flat molecular bond
    between paint and polish to increases light refraction and
    reflectivety."
From: "Houseman, Carl W. x1323"
From: "Jeff Witzer"
1.  Dawn
2.  Clay (with his car wash not the spray that comes with the clay)
3.  Dawn (rinse really well)
4.  Z1
5.  Z5 (to fill swirls - no shine here)
6.  Z6 (shine)
7.  repeat steps 5 and 6 until happy (the 3rd one really popped the
    yellow on my car, Sal says any more than 5 is a waste)
8.  Z2 (protectant - no shine here, either)
9.  Z6 (shine)
10. repeat steps 8 and 9 until happy (2 or 3 should do it)
From: "Spradlin, Bill"
Sal Zaino
(732)785-2951
Zaino Bros.
Date: August 22, 1999
From: David Beale
From: Hollywdwrd@aol.com
Bumper Black
A Mazda -Approved Car Care Product
Protect you Mazda's urethane bumpers and black trim items. Prevents
deterioration and discoloration from weather, polishes, or waxes.
From: chicago869@worldnet.att.net
Rotor Watch

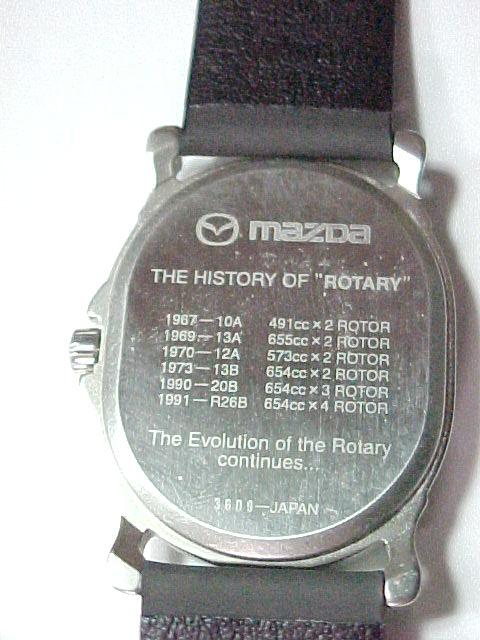
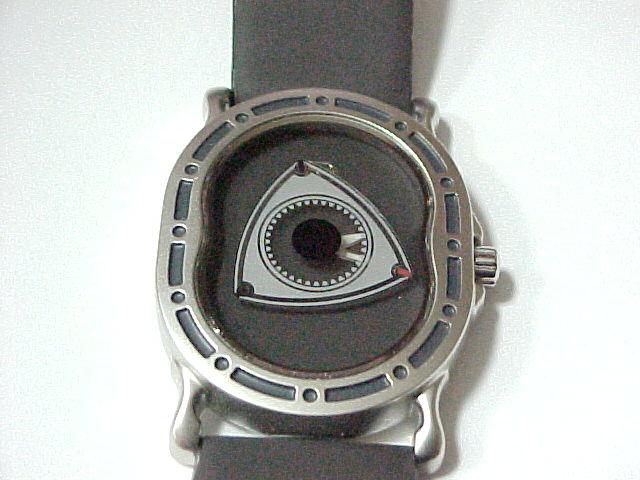
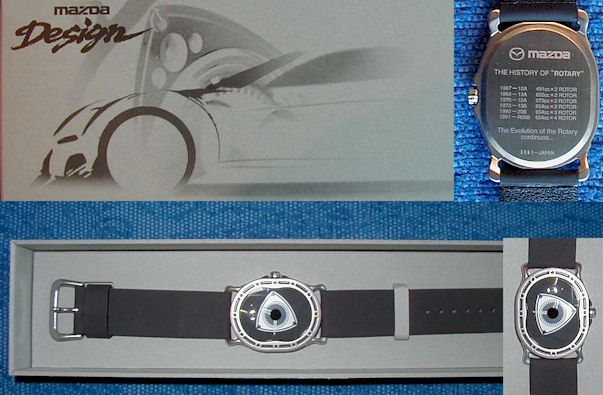

Rotor Clock
From: "Jim Linnihan" (rebelscum@uswest.net)
1986 GXL
![[ Mail me ]](mail.gif)
![[ To Lightning home page ]](rx7_home.gif)
![[ To my home page ]](my_home.gif)
![[ Copyright Notice ]](copyright.gif)